to Candy pippins to look like amber

Last weekend I had the pleasure of participating in a workshop about apples and preservation. Matt Kaminsky spoke about wild apples and grafting as a practice for preserving and propagating varieties. In addition to sharing a number of apple recipes from this site, my contribution to the workshop was to reflect on how updating recipes is a form of preservation of knowledge and to share this seventeenth-century recipe “to Candy pippins to look like amber” from UPenn Ms. Codex 252 (120r). 

The Recipe
 

to Candy pippins to look like amber
take faire large pipins and pare them and bore a hole
through them and put them in an earthen platter in
the ouen stroueing fine sifted sugar upon them, then
sprinkell A littill rose water upon the suger then
bak them in an ouen lett your ouen be hot as for manhant
you stoppe up the ouen and lett them remane in halfe
an houer then tak them out of the dish and lay
them on a lettis or siue an so lett them remaine dry
2 or 3 dayes then thay will Looke clear as Amber
and be finely candied you may keep them all
the yeare

apple peels

Designed with preservation and storage in mind, this recipe uses sugar, rosewater, and heat to transform the tender flesh of apples in season. The instructions ask you to cook your peeled apples in a hot bread oven “as hot as for manhant” or manchet bread. Then they dry for 2 or 3 additional days before storage.

Before the workshop, I’d been exploring this recipe with the juicy Arlet apple (a personal favorite). I even tested it as a sliced apple recipe – considering the various meanings of “pare” – but decided in the end that the recipe called for whole, cooked apples. (Sidenote: Season some apple chips with rosewater and sugar this fall for a delicious treat.)  At the workshop, Matt suggested using a spongier, less juicy apple variety for this preparation.  After consulting with the vendors from Three Springs Fruit Farm at my local market, I decided to try the recipe one more time with Jonathan apples. 

Updated Recipe 

2 apples
1½ teaspoons sugar
1 teaspoon rosewater

Preheat your oven to 350F.

Peel and core the apples. 

Place the apple on a baking sheet. Sprinkle sugar over apples. Then sprinkle rosewater over the apples.

Bake for 1 hour. Allow to cool completely on a cooling rack. 

The Results

These apples fall somewhere between a baked apple and a dried, sugared apple. After baking, and especially after sitting out for a few days post-baking, the apples are a rich, golden color.

I ate one apple hot from the oven. It was gorgeously sweet and fragrant from rosewater. After two days sitting out, it was drier, denser, and more deeply flavored. The rosewater scent had dispersed, but it was even tastier.

If I were to test the recipe again, I might bake it longer or at a hotter temperature to see how much moisture I could draw out before resting. I might also add more sugar and rosewater to see how much “amber” effect I could create on the outside of the fruit. If you make any changes to the recipe as you try it out, let me know how it goes!

to friy oyesters

2019-04-13 17.19.46

to fry oysters

Lately, I’ve been reading M.F. K. Fisher’s Consider the Oyster. Raw, cooked, dangerous, and delicious, Fisher celebrates this humble bivalve in glorious prose. In her chapter “The Well-Dressed Oyster,” she surveys the triumphs and pitfalls of cooking and seasoning oysters. It’s worth quoting at length:

Probably the next simplest way to cook an oyster, and the one most commonly accepted in restaurants, it to fry him. It is too bad, since the method can be good, that so many chefs dip their oysters in a thick and often infamous batter, which at once plunged into the equally obscene grease, forms a envelope of such slippery toughness that the oyster within it lies helpless and steaming in a foul blanket, tasteless and yet powerfully indigestible.

Firm chilled oysters rolled quickly in crumbs and dipped into good fat for almost no time at all, and then served quickly on hot plates with an honest tartar sauce or lemon slices can be one of the best dishes anywhere. (Daunt Books edition, 2018, 24)

When I revisited this recipe “to friy oyesters” from UPenn Ms Codex 252, I was certain I could accomplish the latter: fresh oysters, good fat, a seasoned crumb, and a quick fry. Indeed, it took far longer to shuck the oysters from the fish market than to cook this recipe.

The Recipe

to-fry-oysters.jpg

to friy oyesters

Beat 2 eges with a littell bread
nutmeg and peper and sallt dip in
your oyesters and fry them broun
with freash butter

I was first intrigued this simple recipe when I was setting up the social media accounts for this project back in 2014. This humble receipt has graced the @rare_cooking Twitter avatar ever since. It is written on a small slip of paper that was once pinned into the manuscript – take a look at the pin holes above and below the text. Although the receipt is written on a scrap, the handwriting and inconsistent spelling are similar to one of the manuscript’s dominant hands.

There are many early modern English recipes that call for oysters as an ingredient or showcase oysters on their own. In the culinary tradition, they straddled the boundary between cheap protein for working people and a luxury food associated with seduction. Samuel Pepys writes about eating oysters again and again, sometimes from “my old oyster shop.”

In this simple recipe, the oyster stands on its own. Seasoned with nutmeg, salt, and pepper, and frazzled in butter, these fried oysters are truly delicious.

Updated Recipe

6 oysters, shucked
1/4 cup breadcrumbs
1-2 eggs
1/8t nutmeg
1/8t pepper
1/8t salt
2T butter (for frying)
Sliced lemon

Combine the breadcrumbs and seasoning in a shallow bowl.

Beat 1 egg in a shallow bowl. If one egg does not coat all your oysters, you may need to add a second egg.

Heat a cast iron skilled (or your preferred frying pan) on high for 2-3 minutes. Reduce to a medium heat. Add the butter and let it melt and foam.

Dip the oysters in the beaten egg and then the seasoned breadcrumbs. Put each dipped oyster straight into the frying pan. Do not crowd the oysters. Cook for 2-3 minutes and flip each oyster mid-way through to allow both sides to brown.

Eat immediately. Dress with lemon to your taste.

2019-04-13 17.27.29

I’m glad that I have a new way to cook and eat this glorious mollusk.

to make mince piyes my Mother’s way

This recipe was featured in Jenn Hall’s wonderful article about our project in Edible Philly.

Many of the culinary manuscripts that I’ve paged through in libraries include mentions of mothers, grandmothers, sisters, female neighbors, friends, and correspondents. Among other things, these small notes reinforce the fact that the recipe archive is an archive of women’s knowledge and community. (Many smart people have written about this topic, but these two posts from The Recipes Project about emotion and community come to mind immediately.)

Of course, these notes  always make me think about the recipes that circulate in my own community. I keep my own handwritten recipe notebooks, too. I began to compile the first when I moved to London for a year and wanted to bring recipes with me. The notebook is full of recipes from my mother alongside dishes I’d cooked with friends and roommates in college. These books are part of a larger network of recipes in various material forms: my mother’s recipe box with cards in her handwriting, her mother’s handwriting, her sisters’ handwriting, and the handwriting of new and old friends; the letter I have from my great aunt with her cookie recipe in neat cursive; my notes from the afternoon I spent cooking eggplant parm with my father’s mother because I knew that I was missing crucial steps; printed emails sent from my husband’s family when he wanted to cook a dish from a home. My recipe book is full of attributions: Grandma N’s eggplant parm and my father’s insanely chocolatey variation on her spicy Christmas cookies, Jess’s curried lentils, Joseph’s scones, Grandma O’s soda bread (her mother’s recipe), Erin’s tortilla soup, my family’s favorite chocolate birthday cake, Ruth’s famous zucchini soup recipe that I first made with Bronnie, Rebecca’s salted orange cardamon syrup that I spoon into cocktails at parties, and last (but best represented in my notes) my Mom’s quick meatballs, herb biscuits, stews, zucchini bread, pumpkin pie, and more. This diverse community of women has fed me, sustained me, and taught me how to feed and sustain myself.

I’ve started to collect recipes for mince pies and mincemeats, too. Thanks to my English spouse, Joseph, mince pies are (delightfully) part of my family Christmas now. And this is the second year I’ve added a historical version to the mix. (Here’s the 2015 recipe.) There are still more versions to try.

The Recipe

to make mince piyes my Mother way to make
it in a dishe
take some of the flesshe part of the oxe cheek when it his half boyle
then shreed it with some good beefe sweet about 3 quarters of a pound
halfe a point of Currons a quarter of a pound of ressons stoned
a quarter of one ounce beaten masse and Clouss and beaten Ceniment the
saime quantity a littill salt too spounefulls of sugar ore one and
a halfe too ounces of orring and Lemon pill Candid and put
this in to a dishe with a good pufe past not uery thick
put in to the things a glass of rum

Our Recipe

Savory, rich, and delicious, these mince pies are a welcome variation on the classic British holiday treat. Ox (or beef) cheek is a wonderful braising cut and its inclusion here creates a rich, meaty base for the fruit, spices and rum. Make a batch of mincemeat and prepare fresh pies whenever you have guests coming over. They’re lovely hot from the oven with a nice cup of tea.
The day before I made the mince pies, I whipped up a batch of my favorite pie crust from Orangette, used this recipe from Smitten Kitchen to candy orange and lemon peel, and loosely followed Jamie Oliver’s recipe for braised beef cheeks to cook the meat. Boy did my apartment smell good.

half a braised beef cheek (6oz)
4.5 oz  suet (beef fat)
1/2 lb currants
1/4 lb raisins
1 1/2 t mace
1 1/2 t ground cloves
1 1/2 t cinnamon
2 T sugar
2 1/2 oz candied lemon and orange peel (mixed)
1/3 c rum

Prepare the mincemeat:

Shred or chop the beef into small pieces. For an even mix, make sure these pieces are smaller than your raisins. Grate the suet on a box grater or in a food processor so it is also in small pieces. Combine the beef and the suet in a large mixing bowl. Mix in the currants, raisins, spices, salt, sugar, candied peel, rum and set aside.

Make pies:

Preheat the oven to 425 F.

Roll out the pastry. Using a pastry cutter or drinking glass, cut circles. I used a 2 5/8 in (68 mm) pastry cutter to make nice little pies. Make sure you have an even number of circles so that you have bottoms and lids for all your pies.

I used my handy mince pie pan to make a batch of 12. You can easily make mince pies on a baking sheet by shaping the top piece of pastry over a mound of mincemeat. I think the full amount of mince would make 4 dozen little pies (or even more).

Grease your pan. Put 1 T mincemeat on/in each bottom. Place a lid on each pie. Push down the edges of the pastry to seal. Poke a few air-holes in the lid with with a fork. I brushed the top with an egg wash for a golden crust, but this step is optional.

Bake mince pies for 10-15 minutes until golden brown.  For a festive touch,  sprinkle  with powdered sugar before serving.

The Results

With the perfect mix of sweet, spice, fat, and booze, these mince pies are a decadent holiday treat. What a lovely dish to inherit from a mother, a loved-one, a community, an archive.

to make (lamb) Cuttlets

Lamb dishes will always have a special place in my heart. From this stuffed shoulder I made last spring to these stuffed eggplants from Yotam Ottolenghi and Sami Tamimi’s Jerusalem that I’m preparing for a gathering next week, I’m always eager to try new lamb recipes. So when I saw this receipt for lamb “Cuttlets” in MS Codex 252, of course I was immediately intrigued.

The Recipe

lamb cutlets

to make Cuttlets
take a neck of mutton and cut it Rib from rib then beate them flatt
with a cleaver throwing one some salt and pepper, grate crust of
french bread be sure it tis not burnt for it will be bitter and throw it
one and broyle them, for your sauce take some grauey squese in some
Lemon mince one oynion and put in heat it over the fire and soe put it one
the cutletts

This recipe is relatively straightforward: season and cook your meat, make a delicious sauce, serve. Lamb is a perfectly fine substitute for mutton.

Lamb neck is a cheap and flavorful cut. Sold whole or cut into rounds, it’s perfect for stewing or braising. Despite my love of lamb, I wasn’t familiar with this specific cut when I purchased a frozen lamb neck from the Livengood Farm stall at my local farmers’ market intending to make these cutlets. As took the defrosted meat out of the refrigerator and looked at my recipe notes, I was immediately confronted with a home butchery challenge. How was I going to cut this neck into cutlets!? Thanks to aid and encouragement from my spouse Joseph and our handy, heavy-duty, serrated bread knife, I managed to separate two “cutlet” rounds from the neck. (I slow-cooked the rest of the neck whole in flavorful stock and it was delicious.) To keep this cutlet recipe quick and easy, make sure you ask your butcher to  cut you some nice bone-in rounds or boned neck fillets.

Our Recipe

Makes two cutlets. 1-2 cutlets per person would make a nice serving.

2 lamb neck fillets
2T bread crumbs (unseasoned)
1/2 onion
2T butter
2+ T flour
2T-1/4 c stock (I used homemade chicken stock. Feel free to use whatever you have around.)
2T lemon juice
2T parsley, chopped
salt, to taste
pepper, to taste

Turn on your broiler.

Finely mince the onion and sauté in butter. Leave this cooking on a low heat as you prepare and broil the cutlets.

Coat the lamb cutlets with breadcrumbs and season to taste with salt and pepper.

Put them in an a roasting dish that you are also comfortable using on the stovetop and place under the broiler to cook. (I used a skillet.) Cook for 5 minutes and then turn the cutlets over and cook for another 3-5 minutes. 8-10 minutes total cooking time. Remove the cutlets from the pan.

Transfer the butter and onion mix into the lamb cutlet roasting pan or skillet. Add flour to the pan and stir to make a roux . Add stock to the pan little-by-little and stir to make a thinner gravy. Add the lemon juice and salt and pepper to taste.

Plate the cutlets, pour the sauce on top, sprinkle with parsley. Consume immediately.

The Results

Flavorful lamb, crisp breading, zesty  gravy: this dish is a warm, rich, and comforting treat. Next time I might add sage to the sauce as it cooks. Serve alongside some baked squash, roasted brussels sprouts, or a simple salad.

to make a florintine

I’ve missed baking. The relentless heatwaves this summer have really cramped my style. To use my sourdough starter, I’ve made almost weekly batches of these waffles because I can’t bear to turn on my oven and bake bread.

Today is marginally cooler and I decided to seize the opportunity “to make a florintine” from a recipe in MS Codex 252. 

img_5083

florintine

Alyssa and I have seen many recipes for “florentine” in manuscript cookbooks. This specific recipe is a sweet almond filling baked in a pastry crust.  There are, however, other “florentines” out there. The Oxford English Dictionary defines a florentine as “A kind of pie or tart; esp. meat baked in a dish with a cover of paste” and notes the range of spinach dishes called “florentine” from the mid-eighteenth century to the present day.  (The OED cites a Hannah Glasse recipe which looks like the 252 recipe with added spinach and cheese. )

The Recipe

florintine

to make a florintine

take halfe a pound of the beast Almonds blanch them and beat them as
smalle as the  can with rosse watter ore oring flower watter put in a quater of
a pound of fine sugar beating them well together then take 4 eggs leveing
out the whites, then take a pound of butter and let it be uery good
melt it and then mingle it all together in the butter and soe put
it in to puffe paist

Our Recipe

Our recipe is quartered from the specific proportions in the original and starts with ground almonds. I decided to use rosewater instead of orange blossom water, but feel free to use either.  The original recipe suggests both as options.

1/2 C ground almonds
1t rosewater (or orange blossom water)
1/4 C sugar
1 egg yolk
8 T unsalted butter (1 stick), melted
1 batch pastry (Use your favorite pie crust recipe here. I used Mark Bittman’s recipe from How to Cook Everything)

Preheat your oven to 350F. Butter a pie dish. Roll out your crust and put it in your prepared pie dish.

In a large bowl stir the ground almonds, rosewater, and sugar together. Add an egg yolk and stir with a whisk to combine. Add the melted butter and stir with a whisk to combine. Pour the almond mixture into your prepared crust. Trim or roll excess pastry to make the edges neat.

Bake for 30 minutes until the almonds and crust are golden. Let rest for 10 minutes before serving.

The Results

My British spouse Joseph looked at finished product and asked if I had made Bakewell tart. This was a great guess. The “florintine” from MS Codex 252 is similar to a Bakewell tart but it lacks that iconic layer of fruit compote underneath the almond filling.

This is a sweet, buttery, nutty tart. The rosewater is a mild note amidst the other deep flavors. With Bakewell tart on my mind, I spread some raspberry jam on my second piece and liked it even better.  Serve this with fresh or cooked fruit or preserves.

To presarue quincis to by in gilley

These preserved quinces, like the preserved apples and apricots, will be a delightful accompaniment to the pancake recipes we posted last week.

When I was in kindergarten, our class held an alphabet feast. Each of us was assigned a letter of the alphabet and tasked with providing a food whose name began with that letter. The “A” student could bring apples, the “P” student could bring pie, as the “Q” student I faced a great challenge. But, as always, my brilliant and resourceful mother had an idea: Quince Jam. I’m not sure I had ever tasted quinces before that day when we finally found a jar of imported Quince Jam after visiting what seemed like every specialty store in the western towns of Essex County, NJ. The “Q” student in the the other class may have had an easier time making quiche than hunting for quinces, but I think that my mom and I came out on top. My classmates and I ate quince jam on saltines sitting cross-legged on the classroom floor, or at least that’s how I remember it. I don’t think I tasted quince again until the man who is now my husband poached them in wine for dessert one cold winter evening in London.

Recalcitrant and inedible in their raw state, quinces have long inspired fear and love among cooks. Amanda E. Herbert shows how a gifts of “Marmalade of Quinces,” or other sugared fruits, circulated in a female social network in her book Female Alliances: Gender, Identity, and Friendship in Early Modern England. Local, hearty English quinces were softened and tempered with boiling and the extravagant use of imported sugar. Preserved quinces shared between women demonstrated generous consumption of expensive sweeteners and inborn feminine skills at taming the unruly quince. Molly Wizenberg’s recent post on Orangette reflects a twenty-first-century view of this very same issue and offers a great, simple recipe for taming and tenderizing this “esoteric fruit.” Since that early encounter and more recent reintroduction, I’m hooked on quinces. I’ve been making Hugh Fearnley-Whittingstall’s Sticky Quince and Ginger Cake for years now, Nigella Lawson’s Quince Meat is my household’s standard mince pie filling (or at least it was before  these came along), and I’ve long admired quince-whisperer Nigel Slater’s recipes.

This recipe from UPenn MS Codex 252 instructs cooks in a complex method for preserving quinces in a gelatinous liquid thickened with sugar and pectin from apples and the quinces themselves. Our recipe, below, is a bit simpler.

The Recipe

preserved quinces

To presarue quincis to by in gilley    X

Take thicke rind quincs and pare them uery thin and lay them
in water ther or four dayes then boyle them tender in fare water
then take them out of that water and put them into a pane of could
water all the night next day tak them up and dry them with a fare cloth and
put them into as much clarefide sugar as will couer or them and so
Let them boyle lasurly in that sugar now and then tosng them to take
then Let the stand in a nerthen pan till the next moring then set
them on the fire agane and when you se them louke cleare and tender
pouer them into a woden sive and let the surup drop from them then
put a quarterne of apele water and a pound of frish sugar into that serup and
one it will make your quincis in quiking gelley

Despite the lengthy description of cooking methods in this recipe, it is easy to streamline and requires very few ingredients. A quick search on Early English Books Online reveals many uses of “apple water,” or water in which apples have been boiled, in culinary and medicinal recipes. For this recipe, it seems to add pectin to the preserving liquid.

Our Recipe

1 quince
1 apple
3/4 c sugar (to use in 1/4 c and 1/2 c quantities)
6 c water (to use in 2 c quantities)

1 jar (if you plan to can these or prefer to store them in a jar)

*These proportions yield 1 ball jar of stewed quinces in sweet liquid. This can easily be doubled or tripled to preserve more fruit.*

Peel and core a quince. Slice it thin.  Soak in two cups of cold water overnight (or for a few hours depending on what suits your schedule).

Drain the quince from the soaking water and put in a pot with 1/4 c sugar and 2 c water. Bring to a boil and then turn it down to a simmer to cook the quince “leisurely” until soft. (I let my quince simmer for about two hours while I was doing other things.) Using a colander, strain out the quinces and discard the cooking liquid. Set quinces aside.

Either during the last half hour of cooking the quinces, or after, prepare a jar and make the apple water/preserving liquid.

Fill your jar with boiling water and then discard. Put the quinces in the jar.

Roughly chop an apple, skin core and all. Put the apple in 2 c water in a pot. Bring to a boil and then simmer for a half hour.  Remove the apples and add 1/2 c sugar to the cooking liquid. Boil until the sugar dissolves. Pour this liquid into the jar with the quinces. Let cool before covering.

The Results

Now, these preserved quinces did not  last long in my kitchen. (I eating them with pancake, ice cream, yogurt, cake, etc.) I cleaned my jar with boiling water, but I did not properly can these. If you want to can a batch of these, Marisa McClellan has great advice over here on Food and Jars and in her cookbooks.

Unfortunately, the syrup did not become jelly. I think this is partly because the original recipe instructs cooks to discard the pectin rich quince cooking water. On the other hand, perhaps my apple water could have been prepared more effectively. Luckily, the non-jellied liquid made an awesome syrup for the pancakes. Let us know if your quinces jelly!

To presarue Aprecokes

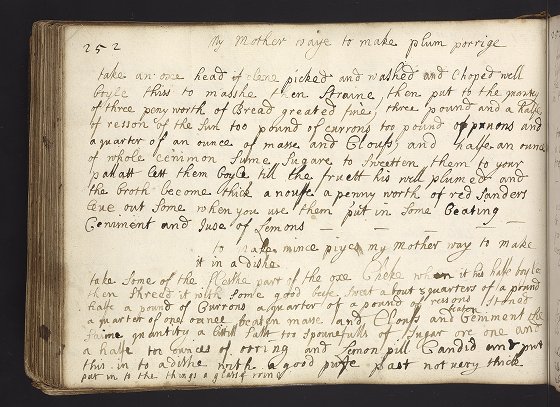
I wanted to try this recipe as soon as I saw it. Although I often have this reaction to beautiful photos of food on blogs or Instagram, when I’m reading three hundred-year-old culinary manuscripts online it’s a different story. I’m curious, puzzled, intrigued, but rarely inspired to drop everything and prepare Fish Custard immediately. I was flipping through one of my favorite manuscripts in the collection, MS. Codex 252, and had an this uncharacteristic reaction: I needed to preserve some apricots right away. This recipe has a lot of elements that I like — stone fruit, very few ingredients, and a low-stakes preserving method. I also had a good reason to believe that it was a particularly reliable or tasty recipe.

preserve apricots, detail

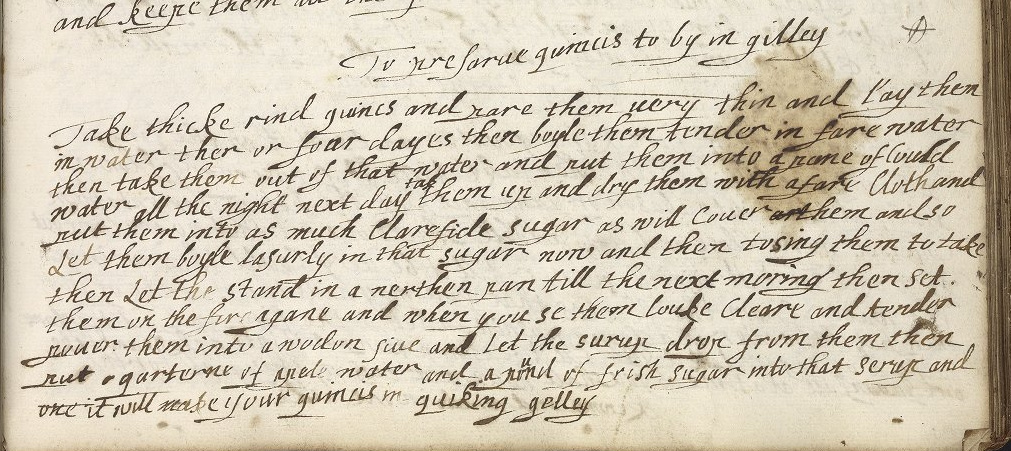
This circle and X marking next to the recipe title indicates that someone cooking from this book prepared preserved apricots and the recipe, most likely, worked. I first learned about these circles, checks, ticks, fleurons, and other marks in recipe books when I heard Wendy Wall deliver a lecture about Shakespeare and early modern women’s medicinal knowledge. (I’m excited to read her new book, Recipes for Thought, when it comes out this fall. ) Wall and other historians of food and medicine consider markings like these part of the progression of scientific knowledge in the kitchen. They are the handwritten remains from many otherwise undocumented experiments. Cooks tried recipes and made (a few) notes about how they turned out. In this same manuscript the recipe for Could Possett was also marked and we loved how that refreshing drink turned out!

Whoever marked this recipe for preserving apricots– the compiler, a household cook, a member of the family from a later generation — was completely correct. This recipe works beautifully and the preserved apricots are a versatile and delicious ingredient to put up as the cold months approach.

The Recipe

preserve apricots

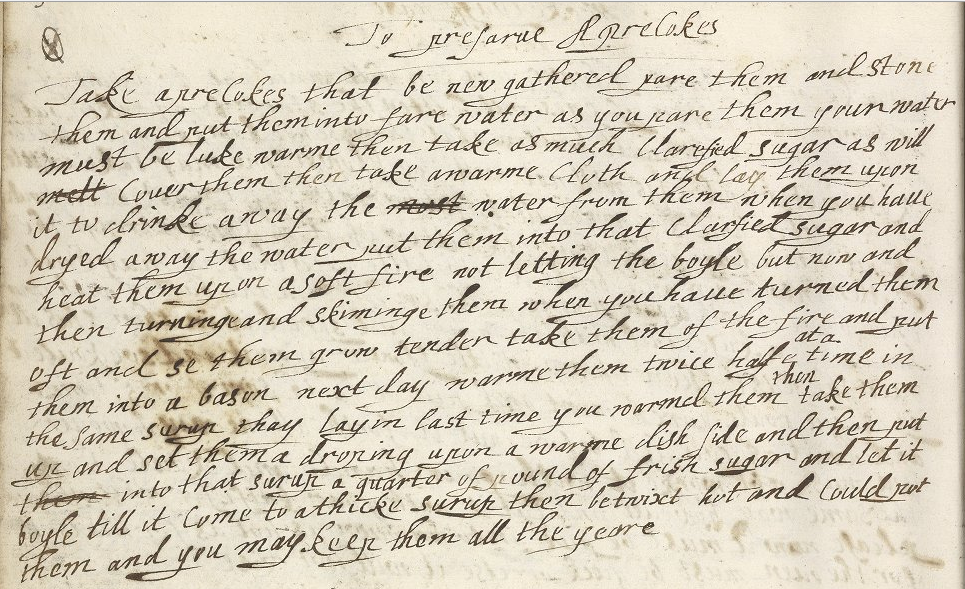
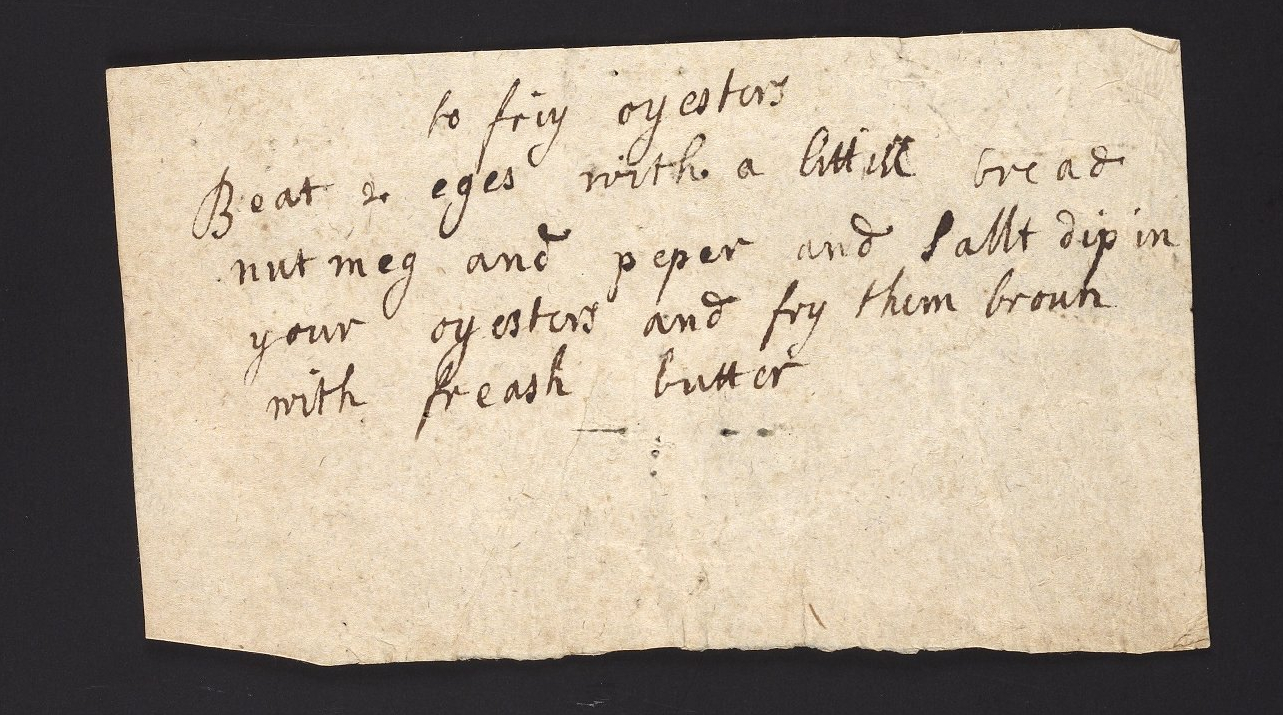
X                             To presarue Aprecokes
Take aprecokes that be new gathered pare them and stone
them and put them into fare water as you pare them your water
must be luke warme then take as much clarefied sugar as will
melt cover them then take a warme cloth and lay them upon
it to drinke away the must water from them when you haue
dryed away the water put them into that clarfied sugar and
heat them upon a soft fire not letting the boyle but now and
then turning and skiminge them when you haue turned them
oft and se them grow tender take them of the fire and put
them into a bason next day warme them twice halfe at a time in
the same surup thay lay in last time you warmd them then take them
up and set them a droping upon a warme dish side and then put
them  into that surup a quarter of pound of frish sugar and let it
boyle till it come to a thicke surup then betwixt hot and could put
them and you may keep them all the yeare

Our Recipe

It’s simple: peel and pit the apricots, wash them, cook them in their own juices with a bit of sugar, cover them with sugar syrup.

Our recipe is for a small amount of fridge-stable, not shelf-stable, preserved fruit. When we acquire a proper canning set-up here at Rare Cooking, we’ll start preserving everything in sight in large quantities. In the mean time, we’re sticking to fridge pickles, freezer jam, and small batches. The apricots should last for a few weeks in the fridge (if you can stop yourself from devouring them all at once.) If you’re a canning whiz and decide to try your hand at this recipe, please share your method in the comments for other interested readers.

Ingredients:

Part 1: To cook the apricots
8 apricots
1T sugar

Part 2: To make the simple syrup
1/4 c sugar
1/4 c water

Method:

Part 1: To cook the apricots
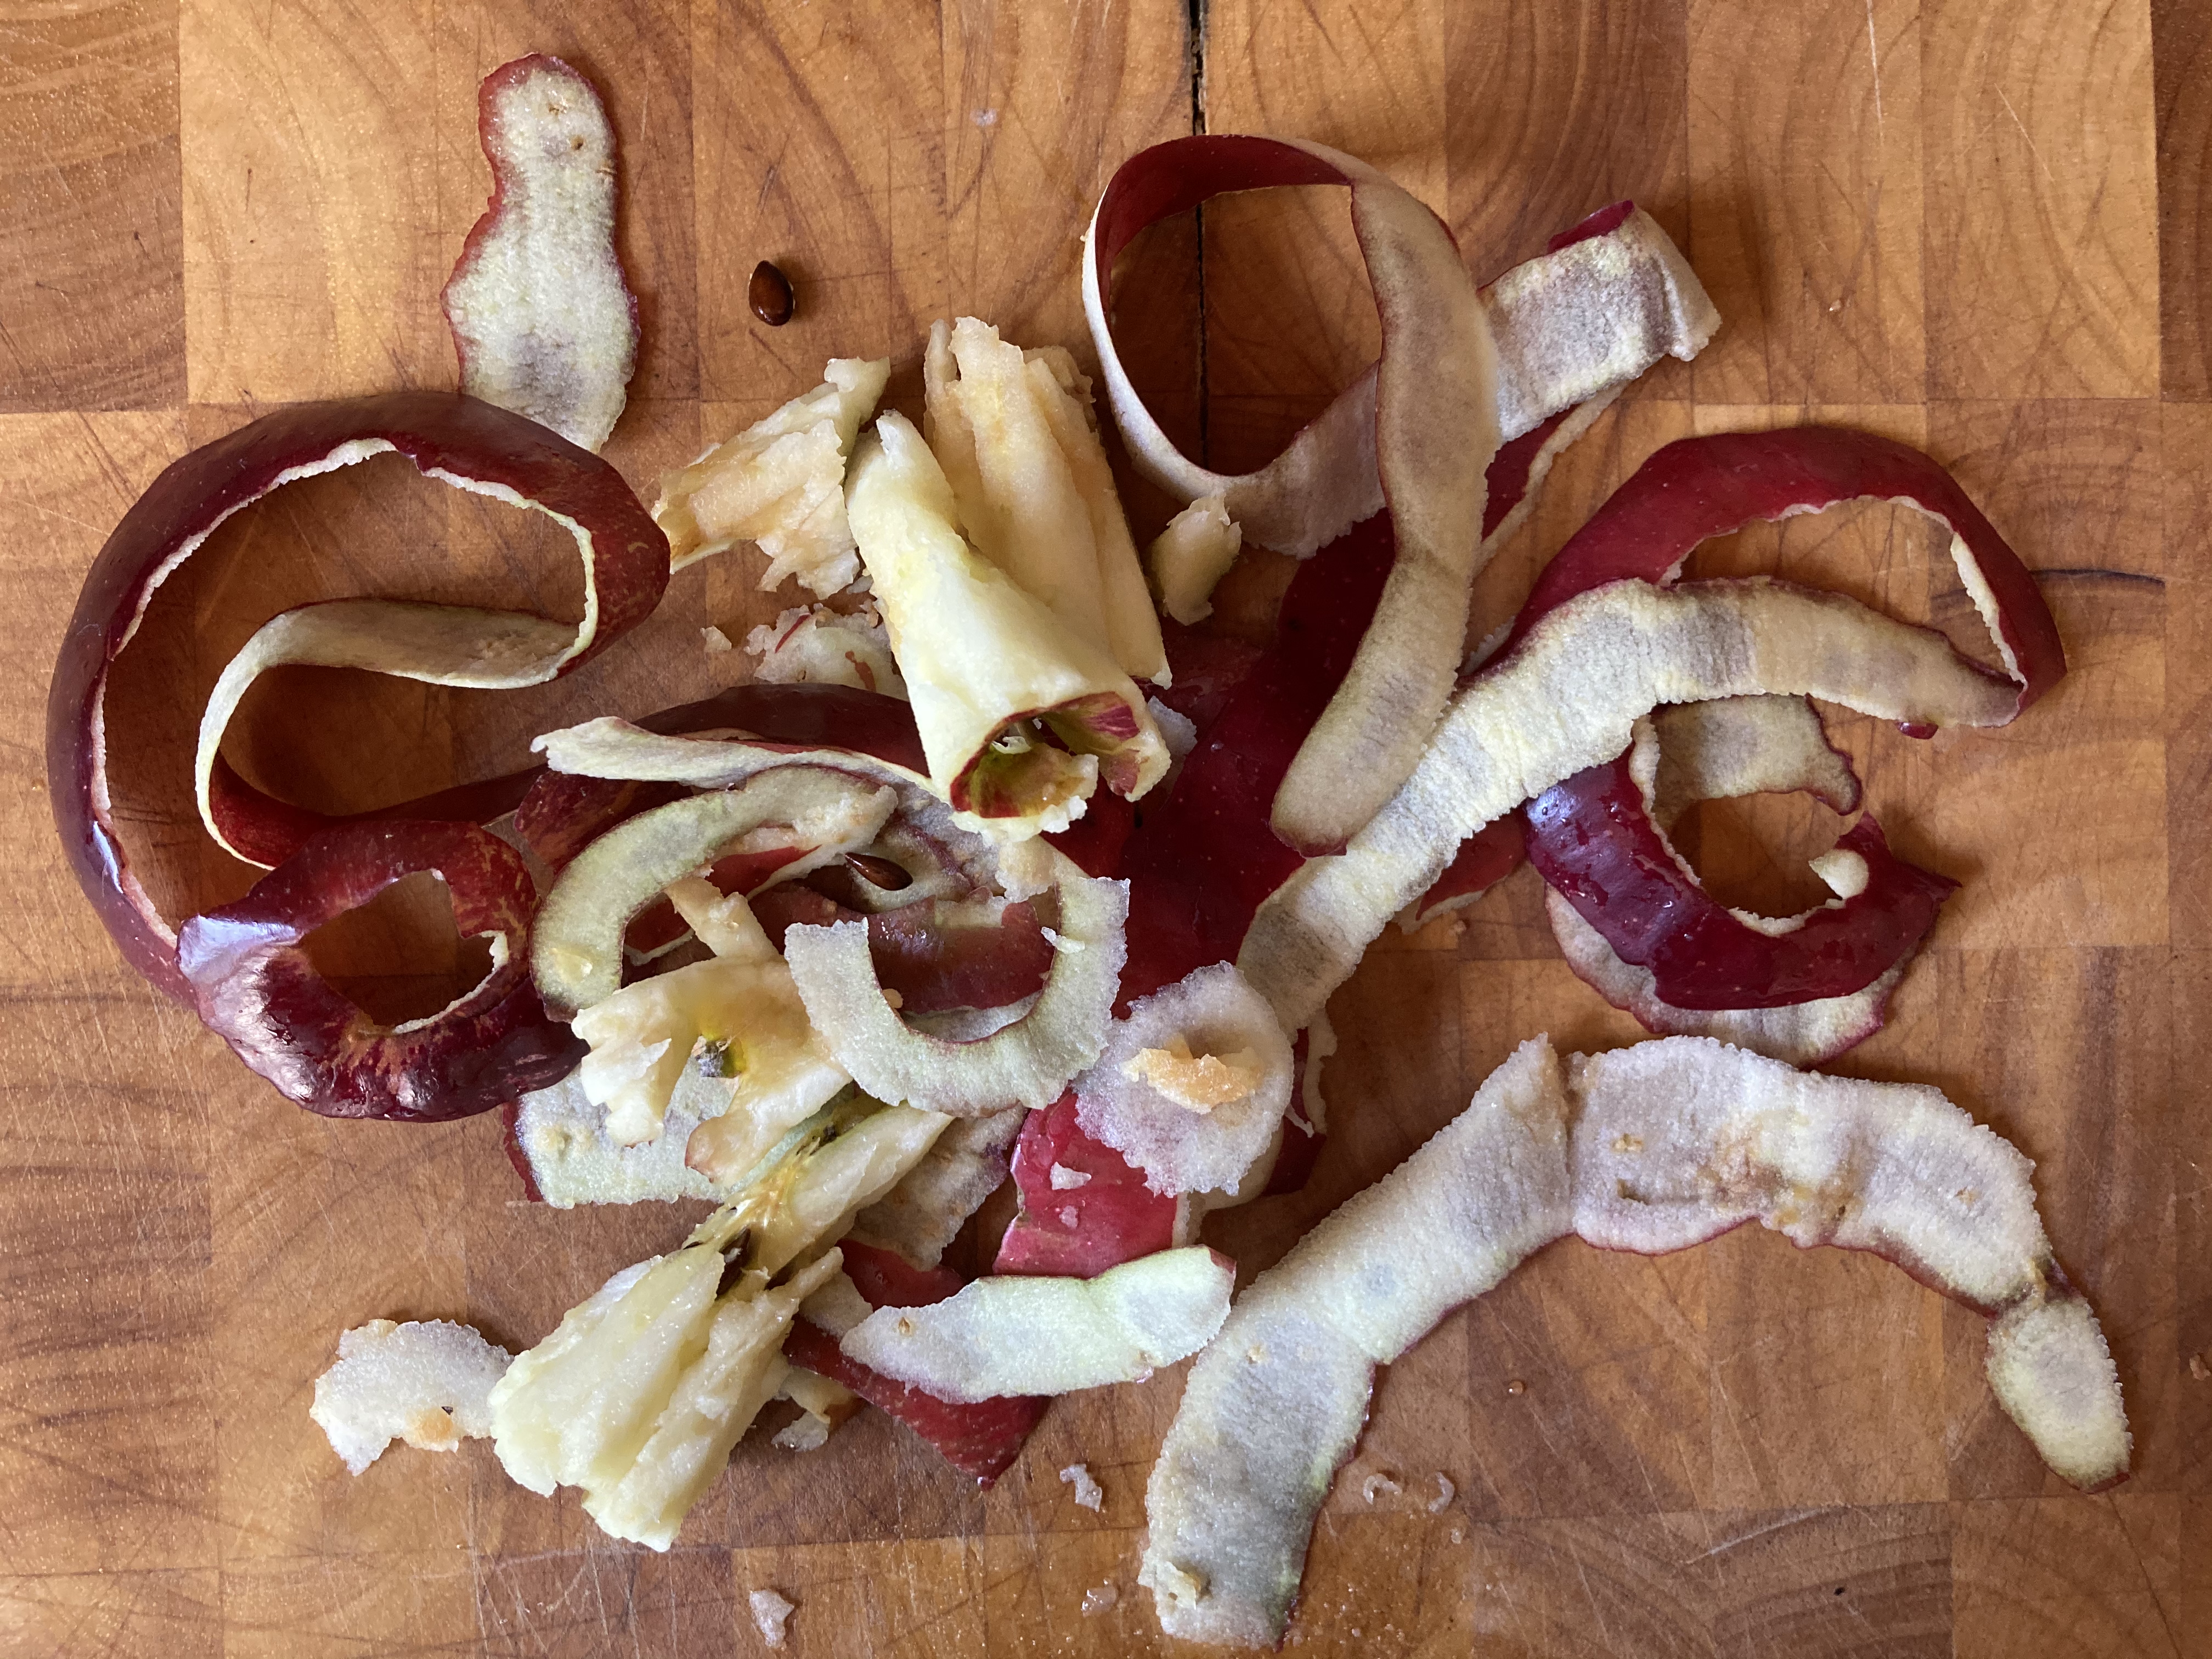
Peel the apricots and remove the pits. Quarter or halve the apricots, depending on their size and your preference. Wash them and let them dry completely on a dish cloth. (I set them aside for about an hour and did other things, but I also think you could skip this step if you are in a hurry.)

Put the apricots in a small pot and sprinkle them with sugar. Cover with a lid and begin to cook on a low heat. After a minute, check and see if the apricots are releasing their own juice. If they’re sticking or the mix isn’t juicy, add 2T water. Cover and cook the apricots for about five more minutes. The apricots should be tender, but still hold their shape. Remove the apricots from the heat and leave in the pot to cool.

Part 2: To make the simple syrup
In the original recipe, the apricots  rest in their juice overnight before they are stored in syrup. Since I wanted to serve them as part of desert that same night, I let them sit for about three hours.

Sterilize a mason jar. Here are a few ways to do this: fill the jar with boiling water, heat the jar in an oven, or wash the jar in a dishwasher.

Return the pot to the stove and heat the apricots in their juices on a low heat.

In a separate pot, make a simple syrup. Mix water and sugar and bring to a boil until all the sugar crystals are dissolved.

Pour the apricot mix into your prepared mason jar. Cover with the hot simple syrup. Label your jar. Allow the apricots to cool before you dig in.
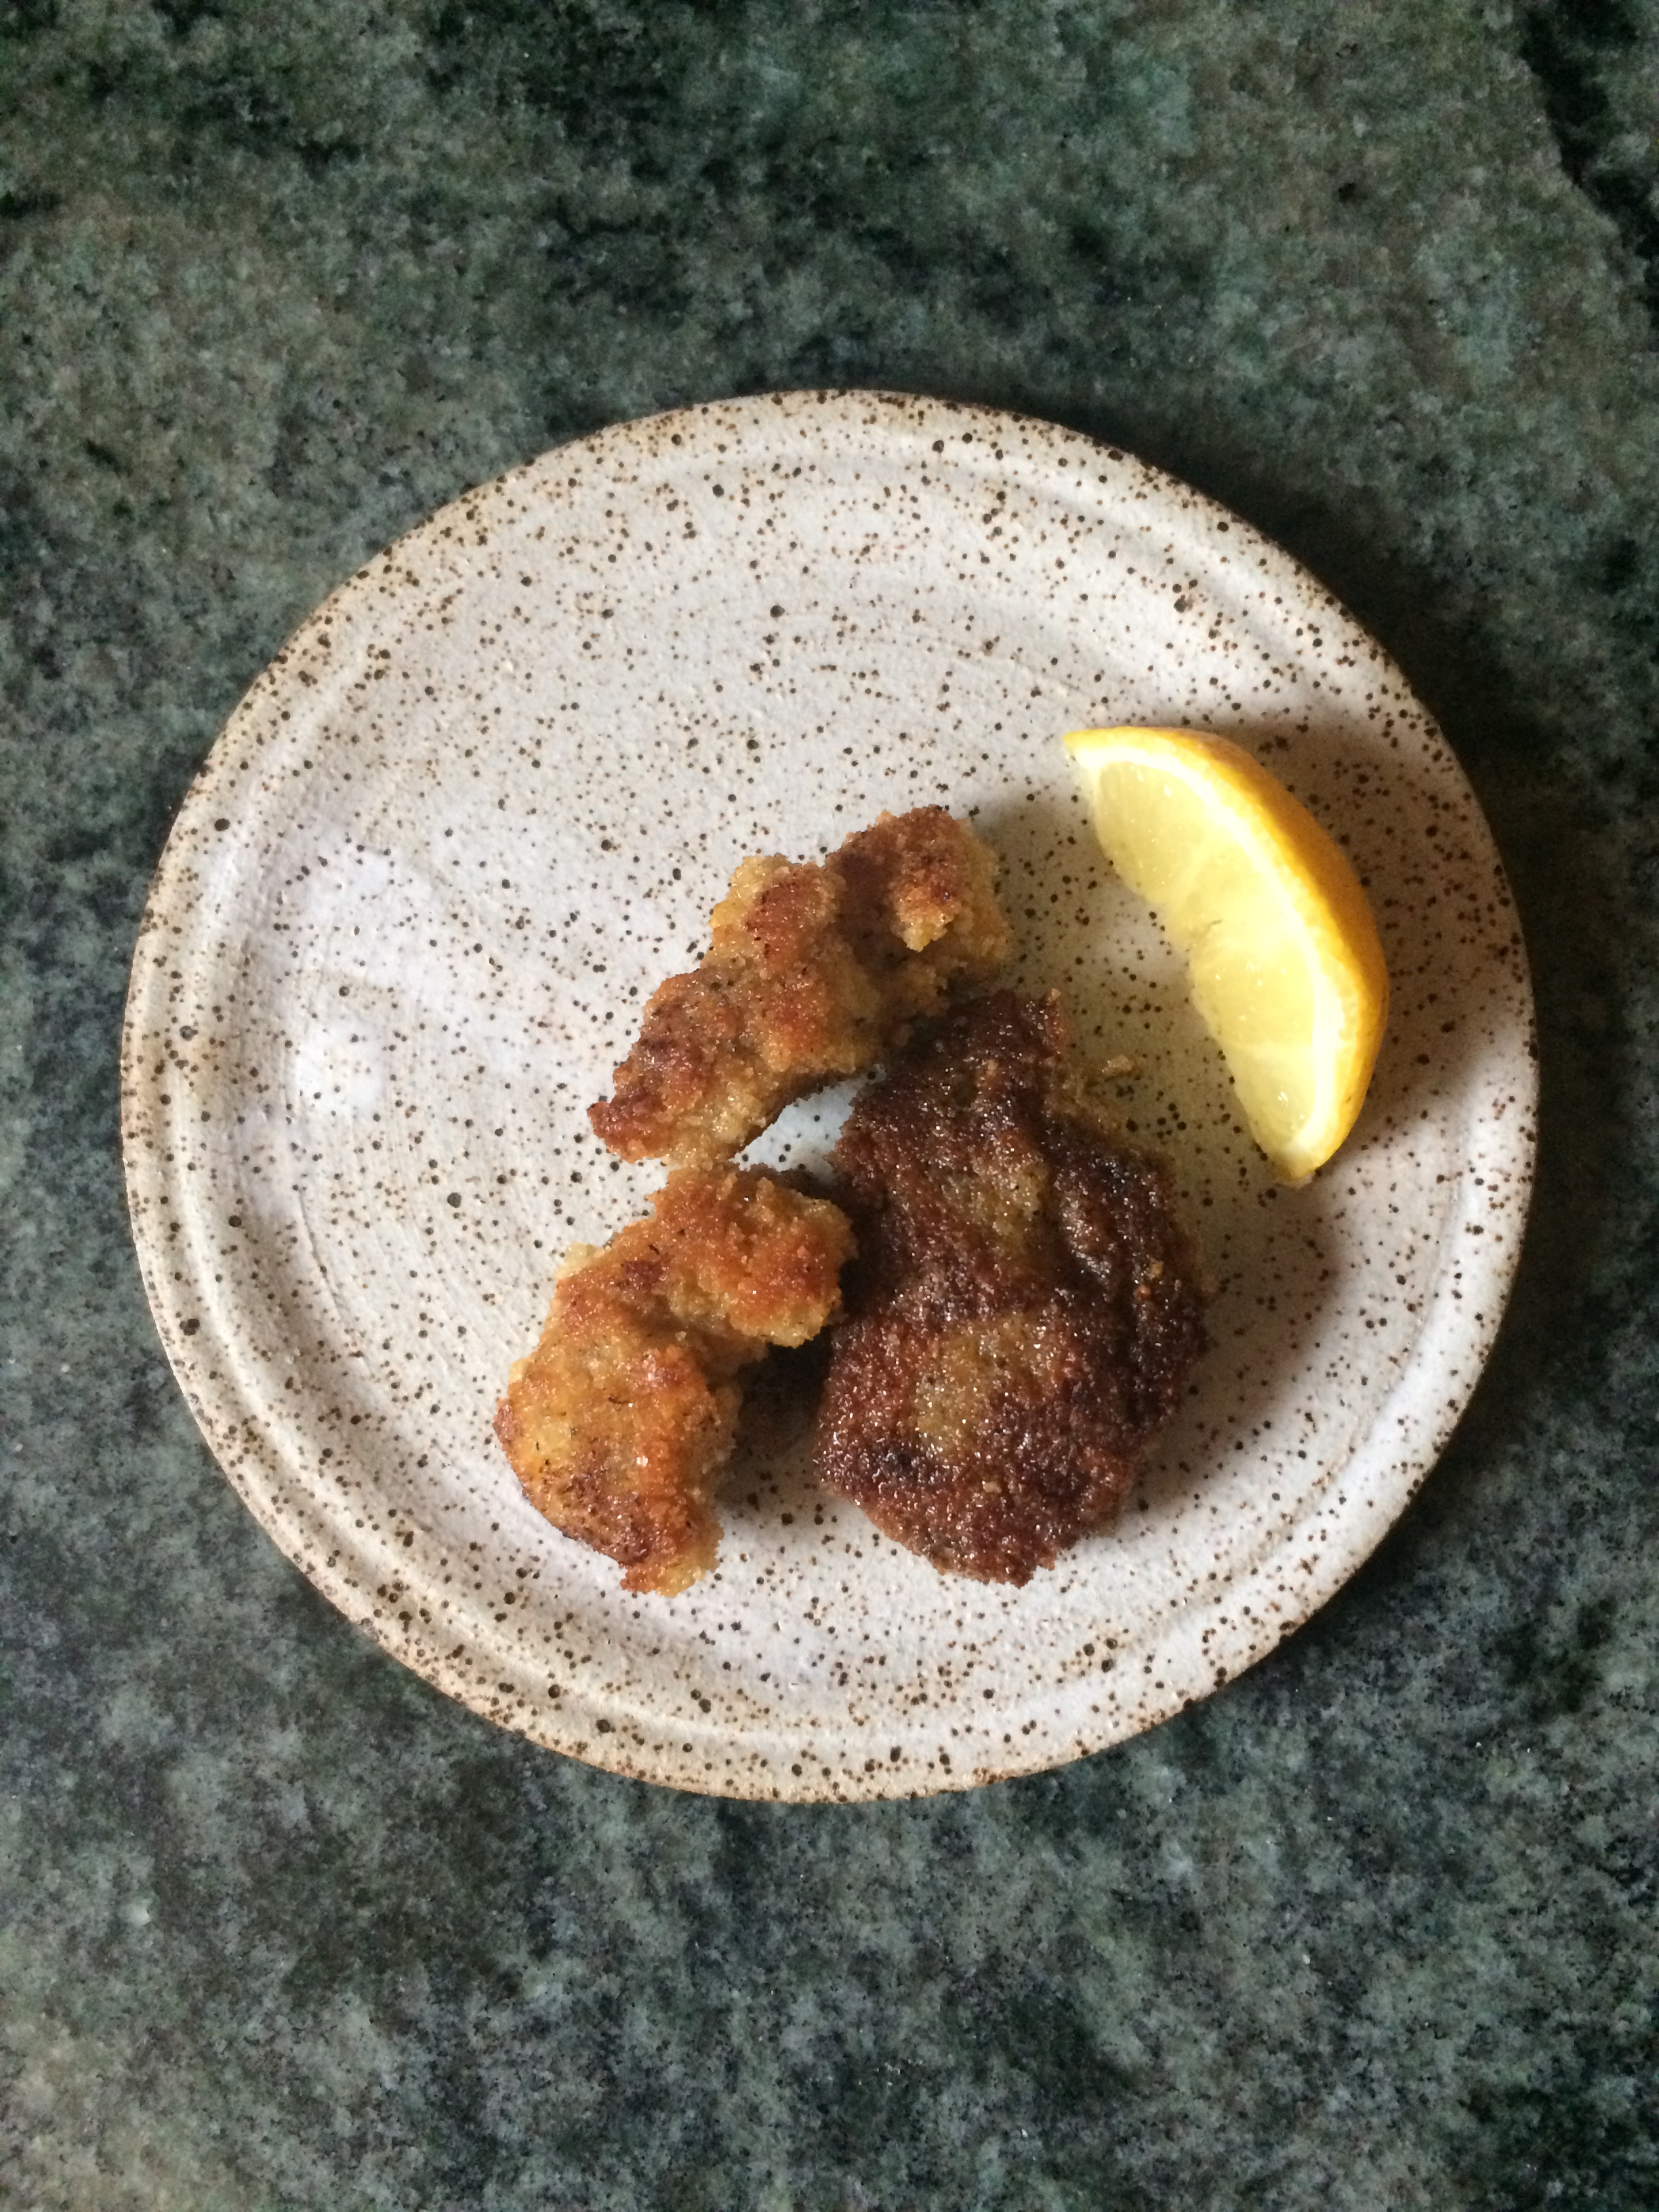
The Results

These apricots taste like summer in a jar. They’re sweet, but not cloying. Alyssa came over for dinner and we ate these spooned onto Dolcezza brown butter gelato. They’re delicious with plain yogurt. When I’ve used all the fruit, I’m going to stir the remaining syrup into sparkling water and sparkling wine.

With minor variations, this recipe would work for most summer stone fruits. Peaches and plums come to mind immediately. Unlike apricots, they’re still available at the farmer’s market in Philly and I know that their season is almost over. The simple syrup component is also ripe for innovation. By infusing the liquid with fresh herbs and dried spices and then straining, these apricots could be seasoned with cinnamon, rosemary, or even coriander.

Now that I’ve fulfilled my apricot craving, I might preserve some peaches with a thyme-infused simple syrup this week before the peaches disappear and my thyme plant goes into hibernation.

to make an orange puding

It’s citrus season in southern California. My weekly farmer’s market is full of varieties I’ve never seen before. On the freeway this week, I drove past a truck pulling two caged trailers almost overflowing with small oranges. It inspired me. Later that day I decided to try this recipe for an “orange puding” from Ms. Codex 252 because I had all the ingredients in my kitchen: navel oranges, eggs, sugar, and butter. I also had some leftover pastry in the freezer, but making a batch from scratch would only add salt and flour to that ingredients list! This dessert is somewhere between a modern pudding and a custard pie and it captures the powerful taste of oranges.

The Recipe

orange puding

to make an orange puding

Take the rinds of 3 oringes boyle them in 3 watters ore 4 till they be tender
then beat them in a morter put to them 5 eggs leaue out 2 whitts; halfe a pound
of sugar and halfe a pound of butter beat all together tell it be well mixt then put
it in a Dishe with a littell puffe paest Crust one the top and the Bottom

Our Recipe

I made very few changes to this one. I halved the quantities to try it out in a smaller pan, so I’ve included full and half ingredients below. I also decided to make a lattice top for the pie instead of completely enclosing the custard. This allowed me to keep an eye on how it was cooking. It also allowed the top of the custard to form a beautiful, crunchy crust that added a great texture to each bite.

Full                                                                         Half

3 oranges                                                               1 1/2 – 2 oranges, depending on size
5 eggs (3 whole, 2 yolks)                                     3 eggs (2 whole, 1 yolk)
1/2 lb sugar (1c)                                                   1/4 lb sugar (1/2 c)
1/2 lb butter, soft (2 sticks or 16 T)                  1/4 lb butter, soft (1 stick or 8T)
1 batch pastry (Use your favorite pie crust recipe here. I used Mark Bittman’s recipe from How to Cook Everything)

Prepare your pastry and follow instructions on chilling or resting.

Preheat the oven to 350 F.

Peel the oranges carefully, avoiding the bitter white pith. Put the orange rinds into a small saucepan with a cup of water, cover, and bring to a boil. Simmer until the rinds are tender. Set aside to cool.

Butter an ovenproof pie dish. Roll out the pastry and place the bottom crust in the ovenproof dish.

When the rinds are slightly cooled, blitz them in a food processor until they form a bright orange paste. If the food processor is large you may need to scrape down the sides a few times. A mortar and pestle (as the original recipe instructs) or simply chopping the peels finely will also work here.

Cream together the butter and sugar. Either do this by hand, use a standing mixer, or a handheld mixer. Add cooked orange rinds and eggs. Mix until the custard becomes slightly fluffy. Pour into the prepared crust.

Top with a lattice crust, a full crust, or simply leave the custard open.

Bake for 45 minutes. (I checked at 30 minutes and checked every 5 minutes thereafter.) The pie is cooked when the crust is golden and the custard sets –a tester inserted in the center should come out clean.

The Results

At first I wasn’t sure about this one. When I sliced the pie and took my first bite the butter from the custard and the crust was completely overwhelming. But the next day I had friends over to try some archival desserts (stay tuned for more) and my second slice was divine. A day later, the orange flavor had deepened and the butter no longer dominated. I refrigerated the pie overnight, but let it come to room temperature before I served it the second day. This would be a great recipe to make a day in advance of a dinner or gathering.

Although I’m never one to say no to pastry, I think this pudding might be tastier as a crust-less custard like the “carrot pudding” we made a few months ago. This variation would also inevitably decrease the amount of butter in the dish and perhaps render my previous comment irrelevant.

Whether you have too many oranges on your hands or just want to cook something with citrus that tastes bright and fresh, “orange puding” is a quirky winter treat.


to make a Brown Frickasey

As the end of November approaches each year, I get increasingly excited about two things: Thanksgiving turkey and the annual re-run of the “Poultry Slam” episode of This American Life. Like it or not, November and December are the very height of poultry season. Unsurprisingly, there are lots of recipes for cooking poultry in Penn manuscripts from making chicken pot pie and fried chicken (two ways) to numerous instructions for roasting.

When I cooked this recipe last Tuesday it was raining in southern California. It was a major news event out here. It was also one of the first dark, chilly, and damp days I’ve seen in ages. I decided to try a recipe “to make a Brown Frickasey” from MS Codex 252 and it was a perfect dish to warm the house and the belly.

The Recipe

frickasy

to make a Brown Frickasey

tak the Rabbits ore Chickens and cut them into littill pesses then set it
ouer the fire with a Littill butter and burne brown then flowre the meat
before you put it to the butter then put it in to fry it Brown and when it
tis brown put in some strong broth A couple of anchoves season it
with salt and pepper, mince some oynion and strowe it with some
parseley cut smalle you may put in some oyesters sweet breeads
Lamb sones and sausage meat let this stew well together better then
a quarter of an howre if it be not thick enough you may thicken it
with the yolks of too ore three Eggs then squese in the Juice of
Lemon and sarue it up

This is a simple and delicious recipe with lots of room for variation: Brown a delicious mix of meats in butter then add more meat, stock, and flavors. Ken Albala’s Cooking in Early Modern Europe, 1250-1650 describes a fricassee as a method for frying meat and adding a flavorful sauce. As this recipe demonstrates, it is a very flexible method that works well with poultry and other meats. I decided to use chicken breasts, pork sausage, and chicken stock, but I also could have faithfully followed this recipe using rabbit, oysters, sweet breads, or other offal.

Our Recipe

3-4 T butter
2 chicken breasts, sliced into 2-inch strips
4 T flour (for coating chicken)
1/2 lb. pork sausage meat (either sausage removed from its casing or sausage meat sold uncased)
1  onion, medium sized, chopped
4 anchovies, chopped
1 1/2 -2 c chicken broth
salt and pepper (to taste)
the juice of half a lemon
2 T chopped parsley

Lightly flour the chicken strips by rolling them in a plate or bowl of flour. Finish chopping the onion and anchovies and readying the sausage meat . Make sure your stock is also ready to go if you’re defrosting it or using a concentrated boullion preparation.

In a dutch oven or large pot, heat the butter until it melts, smells nutty, and starts to darken in color. Add the strips of floured chicken slowly. Don’t worry if all the chicken doesn’t fit at the beginning because the strips will shrink as they cook. Turn the meat over so that it cooks on both sides. When the outside of the chicken starts to brown, add the sausage meat and cook for 1 minute. Add the chopped onion and anchovies and cook for 1 minute more.

Add the broth and simmer uncovered for 15-20 minutes. When the gravy is thick and everything is well cooked, squeeze the juice of half a lemon into the stew. Sprinkle parsley on top. Serve hot.

Results

My spouse and I devoured this delicious stew with some roast butternut squash, kale salad, and a bottle of fine, west-coast IPA. It was warming and satisfying meal. We both picked additional mouthfuls of sausage-y chicken out of the pot after we’d cleaned our plates.

I started by browning 2 T butter and added about 2 more as the chicken cooked. The sauce thickened into beautiful gravy on its own. I used homemade chicken stock that I (try to) always keep in my freezer. Homemade stock from pork bones would also be a delicious addition. Store-bought or concentrated stocks will work well here, too. But be sure to taste the mix before adding additional salt.

I can see how this method of preparation would work well for a variety of poultry and other meat. The strips of chicken stayed tender and flavorful, but this would be great with dark meat chicken. I used peppery pork breakfast sausage meat from a local farm. I think a pork and sage or even a pork and apple sausage would work well here. Finally, the anchovies added an unexpected note that was more umami than fishy. I suggest that you give them a try if you’re an anchovy skeptic, but not if you absolutely despise these small, flavorful fish. The lemon adds an essential bright note that complements the fat and savory flavors of the dish.


Collar Beef

Although so far our adventures in archival cooking have been mostly meatless, the recipe books in Penn’s collections contain many interesting preparations for meat, poultry, and fish. From a recipe to “Stew a Hare” to instructions for how to make “English Bacon” and “Pickle Pigeons,” these recipe books reveal a no-waste, “nose to tail” approach. Most either use the whole animal in a single preparation or preserve meat for future consumption. However, many of these recipes do not lend themselves to modern, apartment cooking (especially during the Philadelphia summer). Alyssa and I were thrilled to find this relatively simple recipe for “Collar Beef,” or braised flank steak seasoned with fresh herbs, in Ms. Codex 252. Collar Beef is a flavorful and relatively inexpensive recipe for red meat.

collar beef

The Recipe

To make Collar Beef
Take a thinn flank of beefe lay it water three houres
then take it out of the water and salt it well with spanish
salt and let it ly in the salt 1 dais then wash it clene water
uery well then take a Roleing pin and beat it well littell
then with a knife cut the inward side of it crosse then strue
som pepper nutmegg cloues an mace an beat them small
and strew it on the inside of it then take som sauory
time sage an bay leaues shred them uery small an strew
them ore the spice then roll it up an bind it uery hard with
a pack thred then put it into an Earthen pott fill it up
with Clarett and bak it

The flank steak is prepared with salt, dressed with a mix of savory herbs, rolled and trussed with string, and braised in red wine. “Clarett” was (and still is) a common name for red Bordeaux wines in seventeenth- and eighteenth-century England. We used an inexpensive Bordeaux blend. Instead of soaking our steak for three hours and then salting it for a full day, we salted ours for a few hours before we began cooking. At the advice of our butcher, we also did not pound the steak with a rolling pin; instead, he butterflied the cut for us. We couldn’t find the herb “sauory” in our local markets, but we both thought it would be a nice addition to the spice mix to try it if you have it on hand! We also decided to add dry bay leaves to the wine instead of including fresh bay leaves in the roll as they are not always kind to the stomach.

Our Recipe

* Adjust seasoning based on quantity of meat and taste.

1 lb flank steak, boned and butterflied

butcher’s string

2 T fresh thyme, chopped

3 T fresh sage, chopped

1 t ground pepper

1/4 t ground mace

1/4 t ground nutmeg

1/4 t cloves

2 bay leaves

2 cups red wine

salt

A few hours before cooking, lightly salt the flank steak and allow it to rest at room temperature. Wash off any remaining salt and pat the meat dry before proceeding with the recipe.

Preheat oven to 350 F.

Open the butterflied steak and rub the inside with the dry herbs. Close the steak, then spread the layer of fresh herbs on top. Roll the flank steak (we rolled width-wise, to create a shorter and fatter roll than rolling length-wise) so the herbs are encased inside. Tie the steak in 2-3 places with string.

Place the prepared steak in a dutch oven with a lid. Pour in the wine and add the bay leaves. Cook in the oven for 20-25 minutes (or until the steak is cooked to your liking.)

Slice into rounds to serve.


The Result

“Collar Beef” was intensely flavored with wine and herbs. The method of salting and braising the tenderized the notoriously tough flank steak. We found that the central slices were the most balanced. Next time, we might add some chopped garlic and parsley to the herb mix.