Ham Loaves

I’ve been baking a lot of cookies recently. After all, ’tis the season! So when I was browsing through one of my favorite recipe books, MS Codex 1038, I was looking for something savory rather than sweet. I stopped at “Ham Loaves.” Ham loaves? Would this be some kind of ham meatloaf, perhaps? Maybe a ham pate? I was wrong: these are little sandwiches filled with chopped ham and hard-boiled eggs, held together with butter, and very tasty indeed. At the top right of the page is written what looks (to me) like “Mrs. Pirdham.” (So we might think of these as PirdHAM Loaves! No? Too much? Moving on.)

It’s been a few years since my family had a Christmas ham, after my mom discovered this great Martha Stewart recipe for Leek-Crusted Beef Tenderloin. But this year, we’re bringing back the ham on Christmas Eve, and I know what I’ll be doing with the leftovers! These Loaves were even better than I thought they’d be–sort of an 18th-century breakfast sandwich. Scooping out the inside of the roll creates a tidy pocket for the mixture, which I think would also be great inside cheese puffs for a crowd. I could also see myself adding some grated aged Cheddar to the mixture just before assembling the sandwiches. Whatever you like with ham and eggs would work well here!

IMG_1609

I hope that this recipe gives you an idea for using up your ham leftovers, if you have them; if you don’t, it’s easy to do what I did here and get a few slices from the deli counter (in my case, four slices of Virginia baked ham, about 1/8″ thick each). I made a batch of Mary Berry’s Crown Loaf (from her Baking Bible) and used the rolls straight from the oven, but store-bought dinner rolls would work perfectly too, and perhaps be a little closer to the harder rolls I imagine the original recipe would have used.

Thanks to Mrs. Pirdham and her Ham Loaves for a kitchen that smelled like ham and fresh bread on a rainy day.

Original Recipe

Ham Loaves recipe

Ham Loaves

Take the Yolks of three Eggs boiled hard,
and barely the white of One and chop them
very fine. Take about two thirds more of
lean Ham than Eggs, which must also be
chopped very fine, and then mixed [well] with [the]
Egg & made hot together with Butter enough
to make it of a proper thickness. Then fill
halfpenny french Rolls with it either fried
or Crisped in an Oven after [the] Crumb is taken
out. Butter [the] outside, & either put them in a
[tin?] Oven before [the] Fire, or any other that will
not make them too hard.

Updated Recipe

3 hard-boiled eggs: 3 yolks + 1 white
6 oz. ham, sliced
2+ tbsp. butter (This amount leaves the mixture crumbly; more would bind it better.)
Rolls of your choice (~4, depending on their size)

Halve the rolls and scoop out some of the inside, then lightly toast them. (And snack on the insides!)

Chop the 3 yolks and 1 white, then dice/chop the ham finely. In a medium frying pan, melt the butter and then add the chopped eggs and ham, cooking for a few minutes until the mixture is warmed through.

Spoon ham-egg mixture into the toasted rolls (I liked a grind of pepper on top, too), and either eat as is or spread a little butter on top of the rolls and pop them back in the toaster oven to warm them.

Makes filling for ~4 medium rolls.

IMG_1632

The Results

Success! I regularly make ham and fried egg breakfast sandwiches on English muffins for a weekend treat, and I love ham in an omelette, so this combo just works for me. It’s quick to make and an easy use for leftovers; plus, it could be doctored up in any number of ways.

However you’re celebrating the holidays, may your days be merry and your meals be delicious.

IMG_1638

Carrott Puff.

Carrot pudding was one our early experiments in this project, and it’s a recipe that we consistently mention when asked for our favorites. So when I found this recipe for “Carrott puff” in UPenn Ms. Codex 1038, it seemed like a good candidate for some more carrot experimentation. A go-to for us, this recipe book has also given us the caraway-studded Desart Cakes, the perplexing Artificial Potatoes, the satisfying Herb Soop, and the wonderful maccarony cheese.

Speaking of which: Marissa worked with Carley Storm Photography to make and photograph some of our favorite dishes. As we’ve joked about before, this project features a lot of beige food that can be hard to photograph, but Carley did so wonderfully. Here is the maccarony cheese’s glamor shot, and we’ll be featuring more of Carley’s photographs.

Photo by Carley Storm Photography http://www.carleystormphotography.com

Photo by Carley Storm Photography http://www.carleystormphotography.com

The Recipe

carrott-puff-ed

Carrott Puff.

Boyl some Carots very Tender, Scrape them, then Mash them, and
take good Cream, and Eggs, and the Whites of two–Beat them with a little
Salt and Grated Nutmeg, Mix all with a little Flower to thicken them,
then Fry them in Liquor.

Our Recipe

6 carrots
1/4 c. heavy cream
1 egg + 1 egg white
salt to taste
pinch nutmeg
5 tbsp. flour
oil, for frying

The Results

This was one of those choose-your-own-adventure recipes: with the exception of calling for two egg whites, it lacks specific measurements. I was thinking these would turn out something like fritters or like pancakes made with leftover mashed potatoes, which was … optimistic. But we write about our first attempts with these recipes, successful or less so, and here’s how my attempt at carrot puffs fell into the latter category.

I decided to mash the carrots by hand with a potato masher, which left them just a bit chunky. (Already sounds appealing, right?) I guessed at the cream, eggs, and flour based on general fritter-/pancake-making experience, though I played with flour along the way. The raw mixture was, shall we say, not entirely appetizing. But I maintained hope!

I fried the first few “puffs” and realized as soon as I went to flip them that they were way too soft – they slid and slumped and were generally uncooperative. I added more flour to the next batch and used more oil and a higher temperature for frying them, which helped, but they were still just not very solid. You might think, as I did, well, maybe these would taste better than they looked? Not particularly. I like carrots – carrot cake, carrot sticks, carrot salad – but these just didn’t taste like much. And they were just too fragile. As Marissa said when I told her my carrot puff woes, “I feel like the carrots have failed us this time.” The carrots, or my ingredient guesses, or a bit of both.

img_7573

I still think these sound good, and I’m reasonably sure that additional tinkering with the proportions might help. (I was running low on carrots, though, and didn’t want to waste additional supplies trying right away.) I did a little digging and found this recipe from Nigel Slater for carrot fritters, made with grated carrots and held together not only with egg and flour but with the help of parmesan. This recipe is actually similar to the proportions I used, except with less flour, so I think that additional tinkering might yield successful puffs. I was running low on carrots, though, and didn’t feel like taste-testing any more carrot puffs immediately. When and if I tackle these again, I’ll report back. In the meantime, I’ll be eating carrots as soup for a little while instead.

To make Newport Ginger Bread

In search of something quick and festive, I made this recipe at my mom’s house, in between walks with the dogs. UPenn MS Codex 895 is signed “Ann M. Plowden, 1756” on the inside front cover; a page later in the book is dated 1844, and the whole thing is written in at least four hands. This is the first time we’ve cooked from this particular recipe book, and I look forward to returning to it.

We didn’t have candied peel or fresh ginger or mace, so I used orange zest and ground ginger and some cinnamon and cloves; I’m not sure that its texture was what it should have been, or whether this should have been baked as a large cake, or rolled out, or in small patted rounds as I made them. But I liked these very much regardless–gingerbread is forgiving! (*Note: thanks very much to our reader who pointed out that I misread/miscalculated and used only 2 tbsp. molasses rather than 3/4 c. Oops! I did in fact enjoy these very much despite that mistake. However, with the proper amount of molasses, these might work better as rolled out cookies. I will be making them again and will provide an update!)

The Recipe

newport-gb-pic

To make Newport Ginger Bread

Take a p[oun]d of flour a quarter of a p[oun]d of sugar 2 ounce
of candied orange peel or Lemon a little mace
the weight of a two shilling of grated white ginger
half a pint of melted butter 4 spoonful of brandy
a p[oun]d or something better of treacle mix it well
& bake it on wafer paper on tin pans in a quick oven

img_7473img_7476img_7480

Our Recipe

[halved from the original]

1 2/3 c. flour
1/2 c. sugar
1 oz. orange peel
1/2 tsp. cinnamon
pinch cloves
1 tsp. ground ginger
1 stick butter, melted
2 tbsp. brandy
3/4 c. molasses

Heat oven to 375F.

Mix all ingredients together in a bowl until fully incorporated. Form the gingerbread as you’d like. For small cookies, bake ~20 mins., until a deeper golden brown and dry to the touch. Cool on a wire rack. This made 20 small cookies.

img_7483

The Results

These are certainly ginger-y! The brandy is a tasty addition that I hadn’t encountered in gingerbread before. They’re dense and a little chewy, and have plenty of flavor. From the instruction to bake it on paper, I was expecting a cake that would bake on parchment in order to turn out more easily. This was more of a dough than a batter, though, and a crumbly one at that (because of my molasses mishap). I settled on patting them into flattened golf-ball-sized rounds, but I will try rolling it out next (with more molasses).

When I’m not distracted by a pug wearing a jinglebell collar and the need to finish wrapping gifts, I might look into why these are “Newport” gingerbread. For now, they taste of ginger and the kitchen smelled festive and warm while they baked. That’s a good Christmas Eve eve cookie.

Happy and peaceful holidays to you.

To Make Marmalet of Pippins

This weekend I had some extra apples and a head cold, so I wanted to make something that felt cozy. Flipping through Judeth Bedingfield’s recipe book, UPenn Ms. Codex 631, I found this recipe To Make Marmalet of Pippins. Apple marmalade? I was intrigued, and I got cooking. (Which really, for me, sums up this project in a nutshell.)

As soon as I saw the cooling marmalade, I thought, wait, this looks familiar… Last December I made Pippins preserved at cristmas, from Catherine Cotton’s recipe book.   This marmalade is, basically, the chopped-up version of those preserved apples, plus more lemon. These two recipe books are contemporaries, probably compiled in the 1690s and early 1700s. The similarity of the two recipes suggests that this method of cooking and preserving apples was probably fairly common at the time, which makes sense: it requires few and readily available ingredients, takes little time, and yields a dish that can be served in a variety of ways.

I also like to imagine that Judeth Bedingfield and Catherine Cotton, whose books have yielded so many recipes for this project, might have been cooking their preserved apples and marmalets around the same time – and here I am cooking them over 300 years later.

img_7245

The Recipe

marmalet

To Make Marmalet of Pippins

Take to a pound of sugar a pound & half of pippins which must be choped
with a knife & put into the sugar with a pint of water they must boile as fast as
possible & when it is allmost boiled enough put in a Little Lemon Peel which must
be first boiled in 9 or 4 waters & when its Cleer enough which will not be soe till it
hath stood off the fire a while you must put in a little Juice of Lemon after which
it may have one boile /

img_7231

Our Recipe
*halved from original

1/2 lb. (1 1/8 c.) sugar
3/4 lb. apples (about 2 small-medium apples), peeled or not, and chopped*
1/2 pint (1 c.) water
1″ wide strip of lemon peel, boiled in 4 changes of water and chopped finely**
juice of 1/2 lemon

Combine sugar, chopped apples, and water in a small saucepan. Bring to full boil and keep cooking, stirring occasionally, for 30-35 mins. (The marmalade might want to boil over near the end, so keep an eye on it.) Remove from the heat and let cool for at least 15 mins., until apples are amber-colored and clear. Add lemon juice and cook over low heat just until simmering.

*Note: I wasn’t sure whether or not to peel the apples. The recipe didn’t specify, but perhaps peeling would have been obvious to seventeenth-century marmalet makers? So I partially peeled the apples, which were originally destined for applesauce and a bit dinged up to begin with. In the finished product, the peel was barely noticeable, so next time I’ll probably skip this step. However, if you’d like a very smooth marmalade, there’s no harm in peeling the apples.

**Note: Somewhat inexplicably, the recipe suggests you boil the lemon peel in “9 or 4″ changes of water. I chose 4. And while I boiled a few strips just in case, I found that one strip about 1″ wide and 2” long provided enough lemon flavor.

The Results

While I liked the preserved apples, I liked this marmalade version even better! The slightly bitter peel cuts some of the sugar, though it’s still very sweet, and this would be lovely spread on bread, an English muffin, or (if you’re like me and make a beeline for them in Trader Joe’s) a crumpet. I was glad I halved the recipe, since it yielded enough for a half-pint jar plus a crumpet slathering; that’s more than enough for me to go through for one batch, but it would easily scale up. I will make this again, especially since a small jar would make a nice holiday gift. I might play with zesting a lemon to see if I can get the same taste without the thicker rind, or with chopping apples even more finely. (I assumed they would cook down a bit, but they largely retained their original shape.) I might also throw in a cinnamon stick or maybe some star anise while the mixture is cooling.

img_7248

To make Rashberry Cream

This time of year, I go overboard on buying apples. I’m easily lured into trying anything pumpkin-flavored. (Including, regrettably, a viciously nutmeg-heavy pumpkin pie gelato recently.) But even as I stock up on squash and canned pumpkin and apples and more canned pumpkin, I start to miss berry season. I like to use frozen fruit as a bridge through the winter and, since I moved recently and have been slowly stocking the fridge and freezer, I was looking for a recipe that could use some frozen raspberries I just picked up.

Enter the ever-reliable UPenn Ms. Codex 205, with a recipe “To make Rashberry Cream.” (And yes, this is how I’ve been saying “raspberry” since I found the recipe. I sound like Sean Connery. Or like someone doing a really, really bad impression of Sean Connery.) It’s just what I wanted: easy and with minimal equipment, since I’m still settling into my kitchen, and a quick weeknight dessert. This would be lovely with fresh raspberries but doesn’t suffer from frozen. It’s very close to a fool, the traditional English dessert made by folding stewed fruit into whipped cream. This includes egg and is thoroughly stirred together over heat, ending up with a solid pink color rather than the marbled swirls of a fool, but it’s still basically a mix of sweetened fruit and cream. In fact, the fool probably originated in the sixteenth century, so this “cream” seems like a slightly custard-y relative, an easy dessert then as now, using just a few ingredients.

The Recipe

rashberry

To make Rashberry Cream

Take a Pint of Cream, boil it with Sugar, beat the Whites
of 2 Eggs, & one Yolk, then put to them half a Pint
Currant Juice, a Pint of Rashberry; when it is cold put
the Juice and Eggs to it sweeten it to your Taste, set it
over a slow Fire to thicken keep it stirring, when it
boils take it off, & put it in Glasses or Dishes, let it
cool & strew some Sugar over it ~

img_7104

Our Recipe

1 c. heavy cream
1/4 c. sugar*
1 egg, 1/2 yolk removed
1/4 c. grape juice (or currant juice if you can get it!)
1 c. (1/2 pint) raspberries, fresh or frozen, whole or mashed or pureed or de-seeded, etc.*

Heat the cream and sugar together, stirring frequently, until sugar is dissolved, about 5 mins. Set aside to let cool. Whisk the egg until frothy, then stir in the juice and raspberries. Add this egg and juice mixture to the cream, stirring over low heat until it starts to boil, about 10 mins. Remove from the heat and pour the cream mixture into serving dishes of your choice. Refrigerate until firm to the touch, covering after the cream has cooled. Serve with sugar if you wish.

*Note: Since the recipe doesn’t specify an amount of sugar, I guessed here, and I liked the results. It’s sweet but not overly so. You can also taste the cream mixture and add more sugar to the fruit and egg mixture, as the recipe suggests.

**Note: How to prepare the raspberries wasn’t exactly clear – at first I thought perhaps whole, but upon another reading the syntax of “half a Pint Currant Juice, a Pint of Rashberry” combined with “put the Juice and Eggs to it” suggested that raspberry juice might be called for. Inspired by fools and because I wanted a little texture (and was afraid the mixture might not set with that much liquid), I let the frozen raspberries thaw and then mashed them with a fork. I liked the way this turned out, but you could also puree the raspberries or strain them if you’re not a fan of seeds. Because this ended up setting fairly firmly, like pudding, I think it would be fine with juice. So if you happen to have raspberry juice, then give that a try and let us know how it turns out!

The Results

This recipe was unsurprising – in a good way. I expected it to taste like raspberries and cream, which it did. I didn’t taste grape but think the juice might have brought out some of the richness of the raspberries, as coffee brings out depth of taste in chocolate. It’s a beautiful pink color, and I liked the raspberry bits throughout. It would be tasty served alongside some crunchy cookies for contrast or even with some additional raspberries on top.

img_7106

[My apologies for the iPhone photos. My camera remains at large, somewhere in a stack of boxes.]

To make a seed cake

So, I chose to make this particular recipe because 1) I had all the ingredients on hand, and 2) it looked easy. I admit it – no loftier goals than that. But isn’t ease and convenience how we often choose recipes? And perhaps the same applied for this cake’s original cooks. After all, we don’t always have the inclination (or eggs) to make a “rich cake” that requires 24 eggs. But a simple cake that requires only four ingredients? No wonder Catherine Cotton included this recipe in her book.

This “seed cake” comes from one of our favorite volumes, Catherine Cotton’s UPenn Ms. Codex 214. We’ve seen seed cakes come up in other seventeenth- and eighteenth-century recipe books, so it seems safe to say that seed cake was probably fairly common at the time. Interestingly, this recipe would have yielded quite a large cake: halved, it more than filled an 8″ round, so this would have been cake for a crowd.

IMG_4867

The Recipe

seed cakes

To make a seed cake

Take the whites of 8 eggs beat them very well then
put the yolks to them & beat them very well together then
put to it a pound of sugar beat & sifted very fine & beat
it for half an hour then make it a little warm over the
fire & after that put in 3 quarters of a pound of flower
very well dryed a quarter of an ounce of carraway seeds
stirr it well together & put it into the pan it will take 3
quarters of a hour to bake it /

Our Recipe
(halved from the original)

4 eggs, separated
1 heaping c. (1/2 lb.) sugar
1 1/4 c. (6 oz. or 3/8 lb.) flour
1.5 tsp. (1/8 oz.) caraway seeds

Preheat oven to 350F. Grease and flour a 9″ round pan or other baking dish.*

In a standing mixer or with a handheld mixer, beat eggs whites until stiff but not dry. Then add egg yolks and beat until mixture is uniformly yellow and still fluffy. Add sugar and beat at medium speed for about 10 mins., or until light and shiny.* Scrape down bowl and stir in flour and caraway seeds with a spatula.

Bake for 45-50 mins., until top is dry and firm to the touch. Cool in pan 10 mins., then run a knife around the edges to loosen it and turn cake out onto a wire rack to cool completely.

*Note: I used an 8″ round pan and, as you can see, barely escaped a cake batter overflow disaster. 9″ would be safer.

**Note: I actually forgot the next step, to “make it a little warm over the fire”! This didn’t seem to detract from the final outcome, but you might set the mixing bowl briefly over a double boiler if you’d like to be thorough!

The Results

I’m always curious to try a recipe that we see come up, with minor variations, across multiple recipe books. But I didn’t have extraordinarily high hopes for this cake – eggs + sugar + flour + caraway seeds? I expected something blandly palatable, mildly sweet, perhaps dense and a little dry.

Instead, I ended up with something between a pound cake and an angel food cake: sweet without being cloying, moist, nicely chewy, with a sweet crackly crust. Hello, seed cake! Welcome to the rotation – I’ll be making this one again. And while the simplicity of the recipe is part of its charm, it also means that there’s plenty of room for experimentation with extracts, zest, different seeds in different amounts, perhaps even finely chopped dried fruit or miniature chocolate chips. Wrapped well, it stayed moist for several days. And it’s a lovely cake to have with tea or coffee.

IMG_4865

Pippins preserved at cristmas

In the happy flurry of holiday baking and cooking, sometimes a simple recipe is welcome. I came across these preserved apples while on the hunt for gingerbread recipes in Catherine Cotton’s recipe book, UPenn Ms. Codex 214. The recipe is in the same handwriting as those for ginger-bread and gengerbread that we experimented with – and really liked – here, so it probably dates to the late 1690s or early 1700s. All these “Pippins preserved at cristmas” require is a few apples, some sugar, a lemon, and water. Whether you make this simple dish or enjoy your own seasonal favorites, we hope you are having a lovely holiday season.

The Recipe

pippins preserved

Pippins preserved at cristmas

Take Pare them & cut them in the midle & take out thire cores
weigh a pound of them and a pound of fine sugar & put to it
a pint of water set the sugar & water on the fire & boyle it a
quarter of an hour then put your pippins into that surrop
& boyle them as fast as you can till they look clear then
squeez in a lemmon & let it be ready to boyle after the
limon is in then put them into glasses for your use /

IMG_4840

Our Recipe

1 lb. apples (~2), peeled, halved, and cored
1 lb. (2 c.) sugar
1 pint (2 c.) water
juice of 1 lemon

Combine sugar and water in a med. saucepan and bring to a boil, cooking for 15 mins.

Add apples and cook them at a steady boil, turning the apples occasionally. (They might want to boil over, so keep an eye on them.) Cook for about 45 mins., until apples are translucent and your kitchen smells delightful. Add the lemon juice and cook for another minute or two. Serve warm or refrigerate.

The Results

These apples are not complicated to make – or to eat! I used up a few apples that were kicking around my crisper after the last round of applesauce, I think a macintosh and a fuji. Both fell apart a bit while cooking, which didn’t bother me, but if you’d like the apples to stay in their halves, a harder variety like a granny smith might work nicely.  The end result tastes of very, very sweet apples, almost honey-like in their intensity. You probably wouldn’t polish off a large bowlful of these. (Which perhaps explains the relatively small yield of this recipe? Perhaps the preserved apples might have been used to flavor other dishes, or have been eaten sparingly on their own for a little taste of something sweet.) I topped them with my favorite maple yogurt to cut through some of the sweetness. With a cup of tea, they made a great breakfast for me and my sweet-tooth.

And while we’re a few days past December 25, as Marissa reminded me, on Christmas day in 1662 Samuel Pepys’ wife was ill, so they celebrated with take-out mince pies and she started making her own “Christmas pies” the next day. Pull a Mrs. Pepys and make these “Pippins preserved at cristmas” well into January.

IMG_4844

To make good Gengerbread

Last week, Marissa and I were very pleased to give a talk on “Shakespeare’s Kitchen” at the Folger Shakespeare Library, part of its Free Folger Friday series. Good timing: the foundations of Shakespeare’s kitchen area at New Place in Stratford-upon-Avon were discovered by an archaeological team (!) just the week before. We cooked up a few new recipes for the event. Now, it’s been suggested that I might be a rabid fan of the Christmas season. I think I’m just enthusiastic. (Typed while looking at the decorated pine branches on my bookshelves [my version of a tree] and listening to Bing Crosby. Ok, fine. Very enthusiastic.) So, we decided to be seasonally festive with these recipes. Along with the (awesome) hot chocolate mix that Marissa will be sharing soon, we investigated early modern gingerbread.

For the gingerbread mission, I turned to a new – to us – recipe book: UPenn Ms. Codex 214.  Both the front and back covers are embossed with the original owner’s name, and the inscription includes a date, so we know that the book originally belonged to Catherine/Catharine Cotton and was compiled starting around 1698. We’ll definitely be revisiting this collection, which contains a range of appealing recipes – including the poached apples I have my eye on next. Cotton’s book turned out to be well-suited to this particular mission, as it contains three gingerbread recipes: one with honey and candied peel, one with brown sugar and milk, and one with treacle and caraway seeds.

Gingerbread as a dessert began appearing in Europe around the fifteenth century, originally as a mixture of breadcrumbs held together with honey and ginger, then shaped using molds. At Queen Elizabeth I’s court, gingerbread was baked into the shape of people and decorated to look like visiting foreign dignitaries – the first gingerbread men! In the late seventeenth century, ginger would have been imported into England (most likely from Jamaica, the Spice Islands, or India) as the whole root, sometimes pickled. That Cotton’s book includes not one but three recipes for gingerbread indicates ginger’s availability and the treat’s popularity by 1698.

IMG_4822


The Recipes

CC 45r

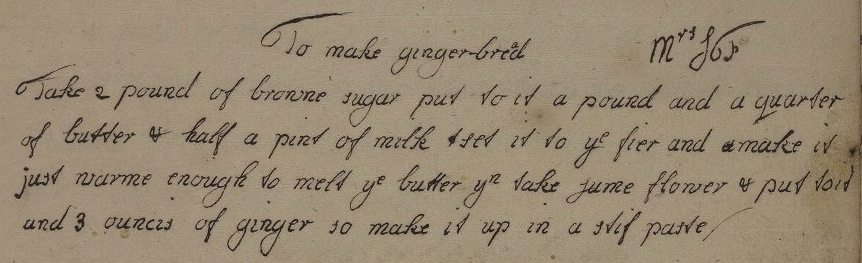
To make ginger-bread                               Mrs JT

Take 2 pound of browne sugar put to it a pound and a quarter
of butter & half a pint of milk tset it to the fier and amake it
just warme enough to melt the butter then take sume flower & put to it
and 3 ouncis of ginger so make it up in a stif paste /

CC 43r

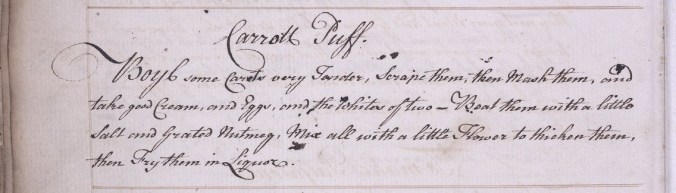
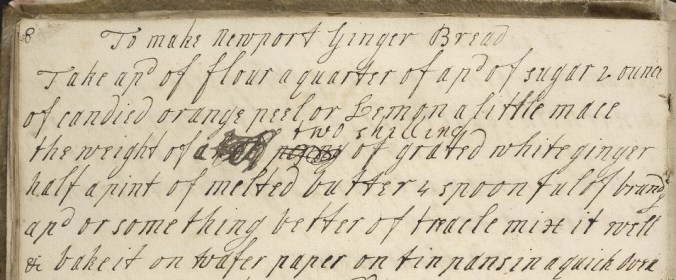
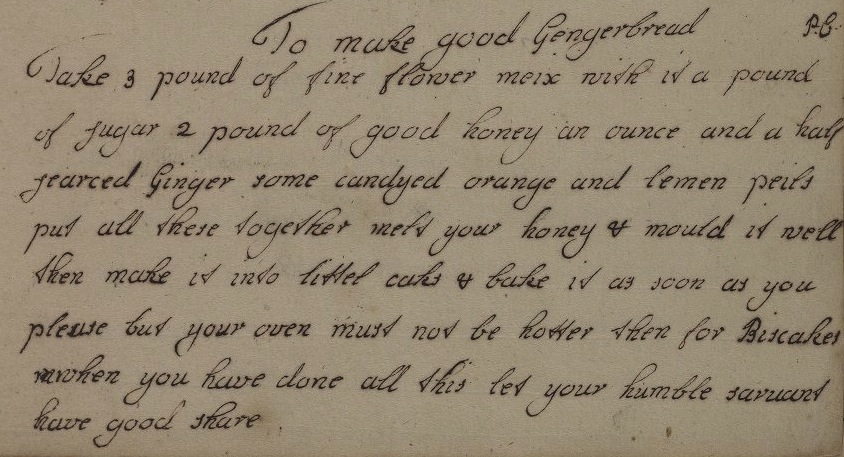
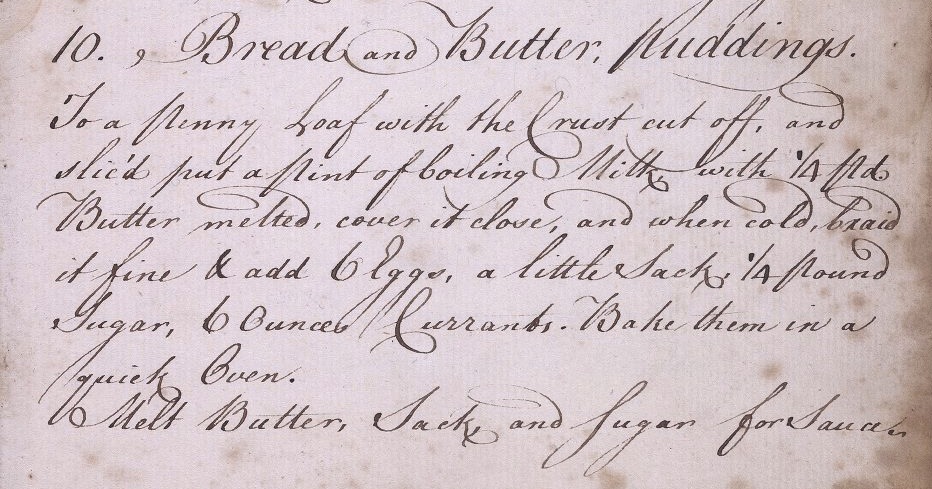
To make good Gengerbread                                      P.C.

Take 3 pound of fine flower meix with it a pound
of sugar 2 pound of good honey an ounce and a half
searced Ginger some candyed orange and lemen peils
put all these together melt your honey & mould it well
then make it into littel caks & bake it as soon as you
please but your oven must not be hotter then for Biscakes
mwhen you have done all this let your humble saruant
have good share


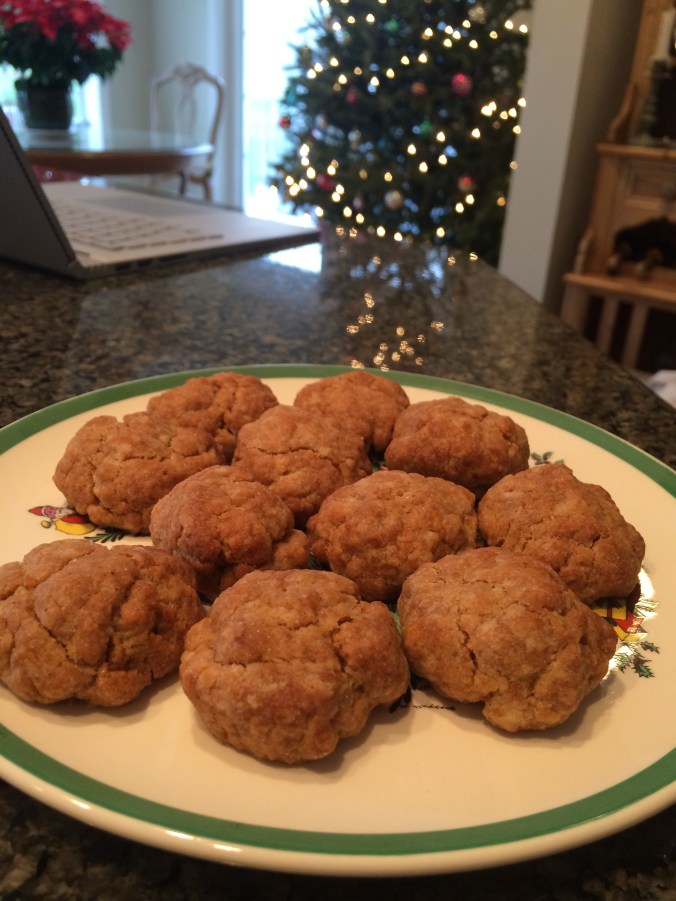
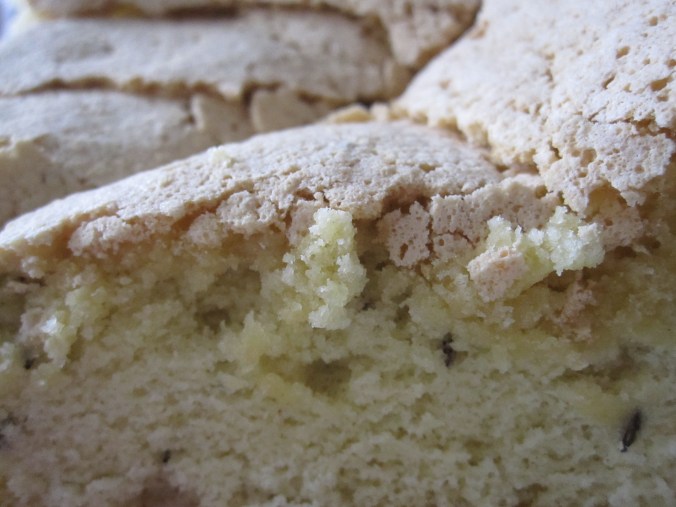
Our Recipe: “To make ginger-bread”
[quartered from original*]

1 1/4 c. brown sugar
10 tsp. butter
1/4 c. milk
2 c. flour
3/4 oz. fresh ginger, peeled and minced (about 1″ ginger root)

Combine sugar, butter, and milk in medium saucepan and cook over low heat, stirring frequently, just until butter is melted. Remove from heat. Add ginger, then stir in flour in two batches.

To use immediately**: Scoop dough in tablespoon-sized balls. Flatten slightly with fingertips or bottom of a water glass.

To roll out***: Pat dough into a disc, wrap in plastic, and refrigerate at least 2 hours or overnight. Roll to 1/4″ thickness on a floured board and cut out in shapes.

Both methods: Bake at 350F for 12 mins., until bottoms are golden brown. (Tops will look slightly puffed but won’t take on much color.) Remove from baking sheet and cool on a wire rack. Makes ~2-3 dozen cookies.

*I halved the recipe and ended up drowning in gingerbread cookies – over 50 of them! Quartering the recipe makes for a more reasonable yield, but it can easily be scaled back up if you’re in need of gingerbread for days.

**The recipe implies that the dough can be used right away. However, I’d added enough flour that it was starting to taste bland and the dough was still fairly soft and sticky. I knew I wouldn’t be able to roll it out, so I scooped it into balls and experimented with flattening some of them. The flatter the discs, the better they baked – the scoops left round didn’t have the nice bite that the thinner cookies did.

***”Paste” can stand in for our modern “pastry” in these cookbooks, so it didn’t seem unlikely that the original could have been rolled and cut out. To manage this, I refrigerated the dough, which made it much easier to handle. In fact, it rolled and baked up beautifully – this is definitely my preferred method for this recipe.

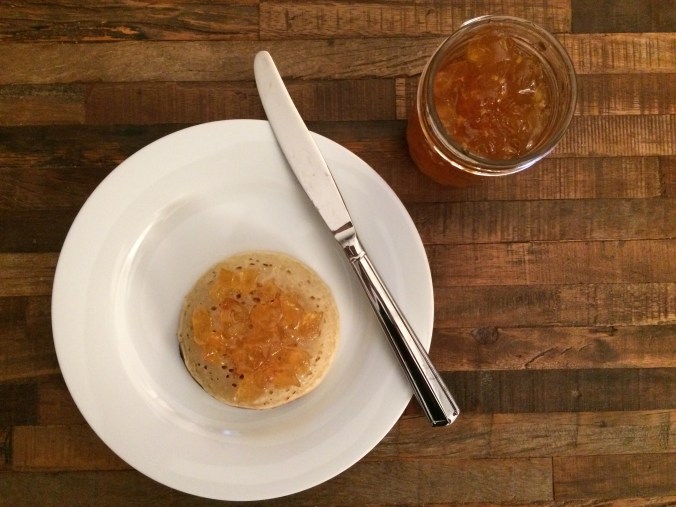
Our Recipe: “To make good Gengerbread”
[quartered from original]

2 1/2 c. flour
1/2 c. sugar
1 c. honey
~1 c. candied peel (2 oranges + 1 lemon), roughly chopped****

Combine flour, sugar, and honey in a large mixing bowl, using a spatula or (as I did) your hands. Add the peel and make sure it is evenly distributed through the mixture. The dough will be very crumbly.

Using a scoop or soup spoon, take about 1.5 tbsp. of dough at a time and squeeze/pat it into a flattened ball. Bake cookies at 350F for 15-18 mins., until lightly browned and fragrant.

****Candied peel is an ingredient we run into frequently in these early modern recipes. As we’ve discussed with some readers, candied peel is readily available in British supermarkets but not in most American ones, so we sometimes end up substituting zest to approximate the taste (if not texture) of the citrus peel. For the gingerbread, however, I wanted to see how the peel would work with the ginger and also thought the sticky peel might help these crumbly cookies hold together, so I made my own using this recipe.


The Results

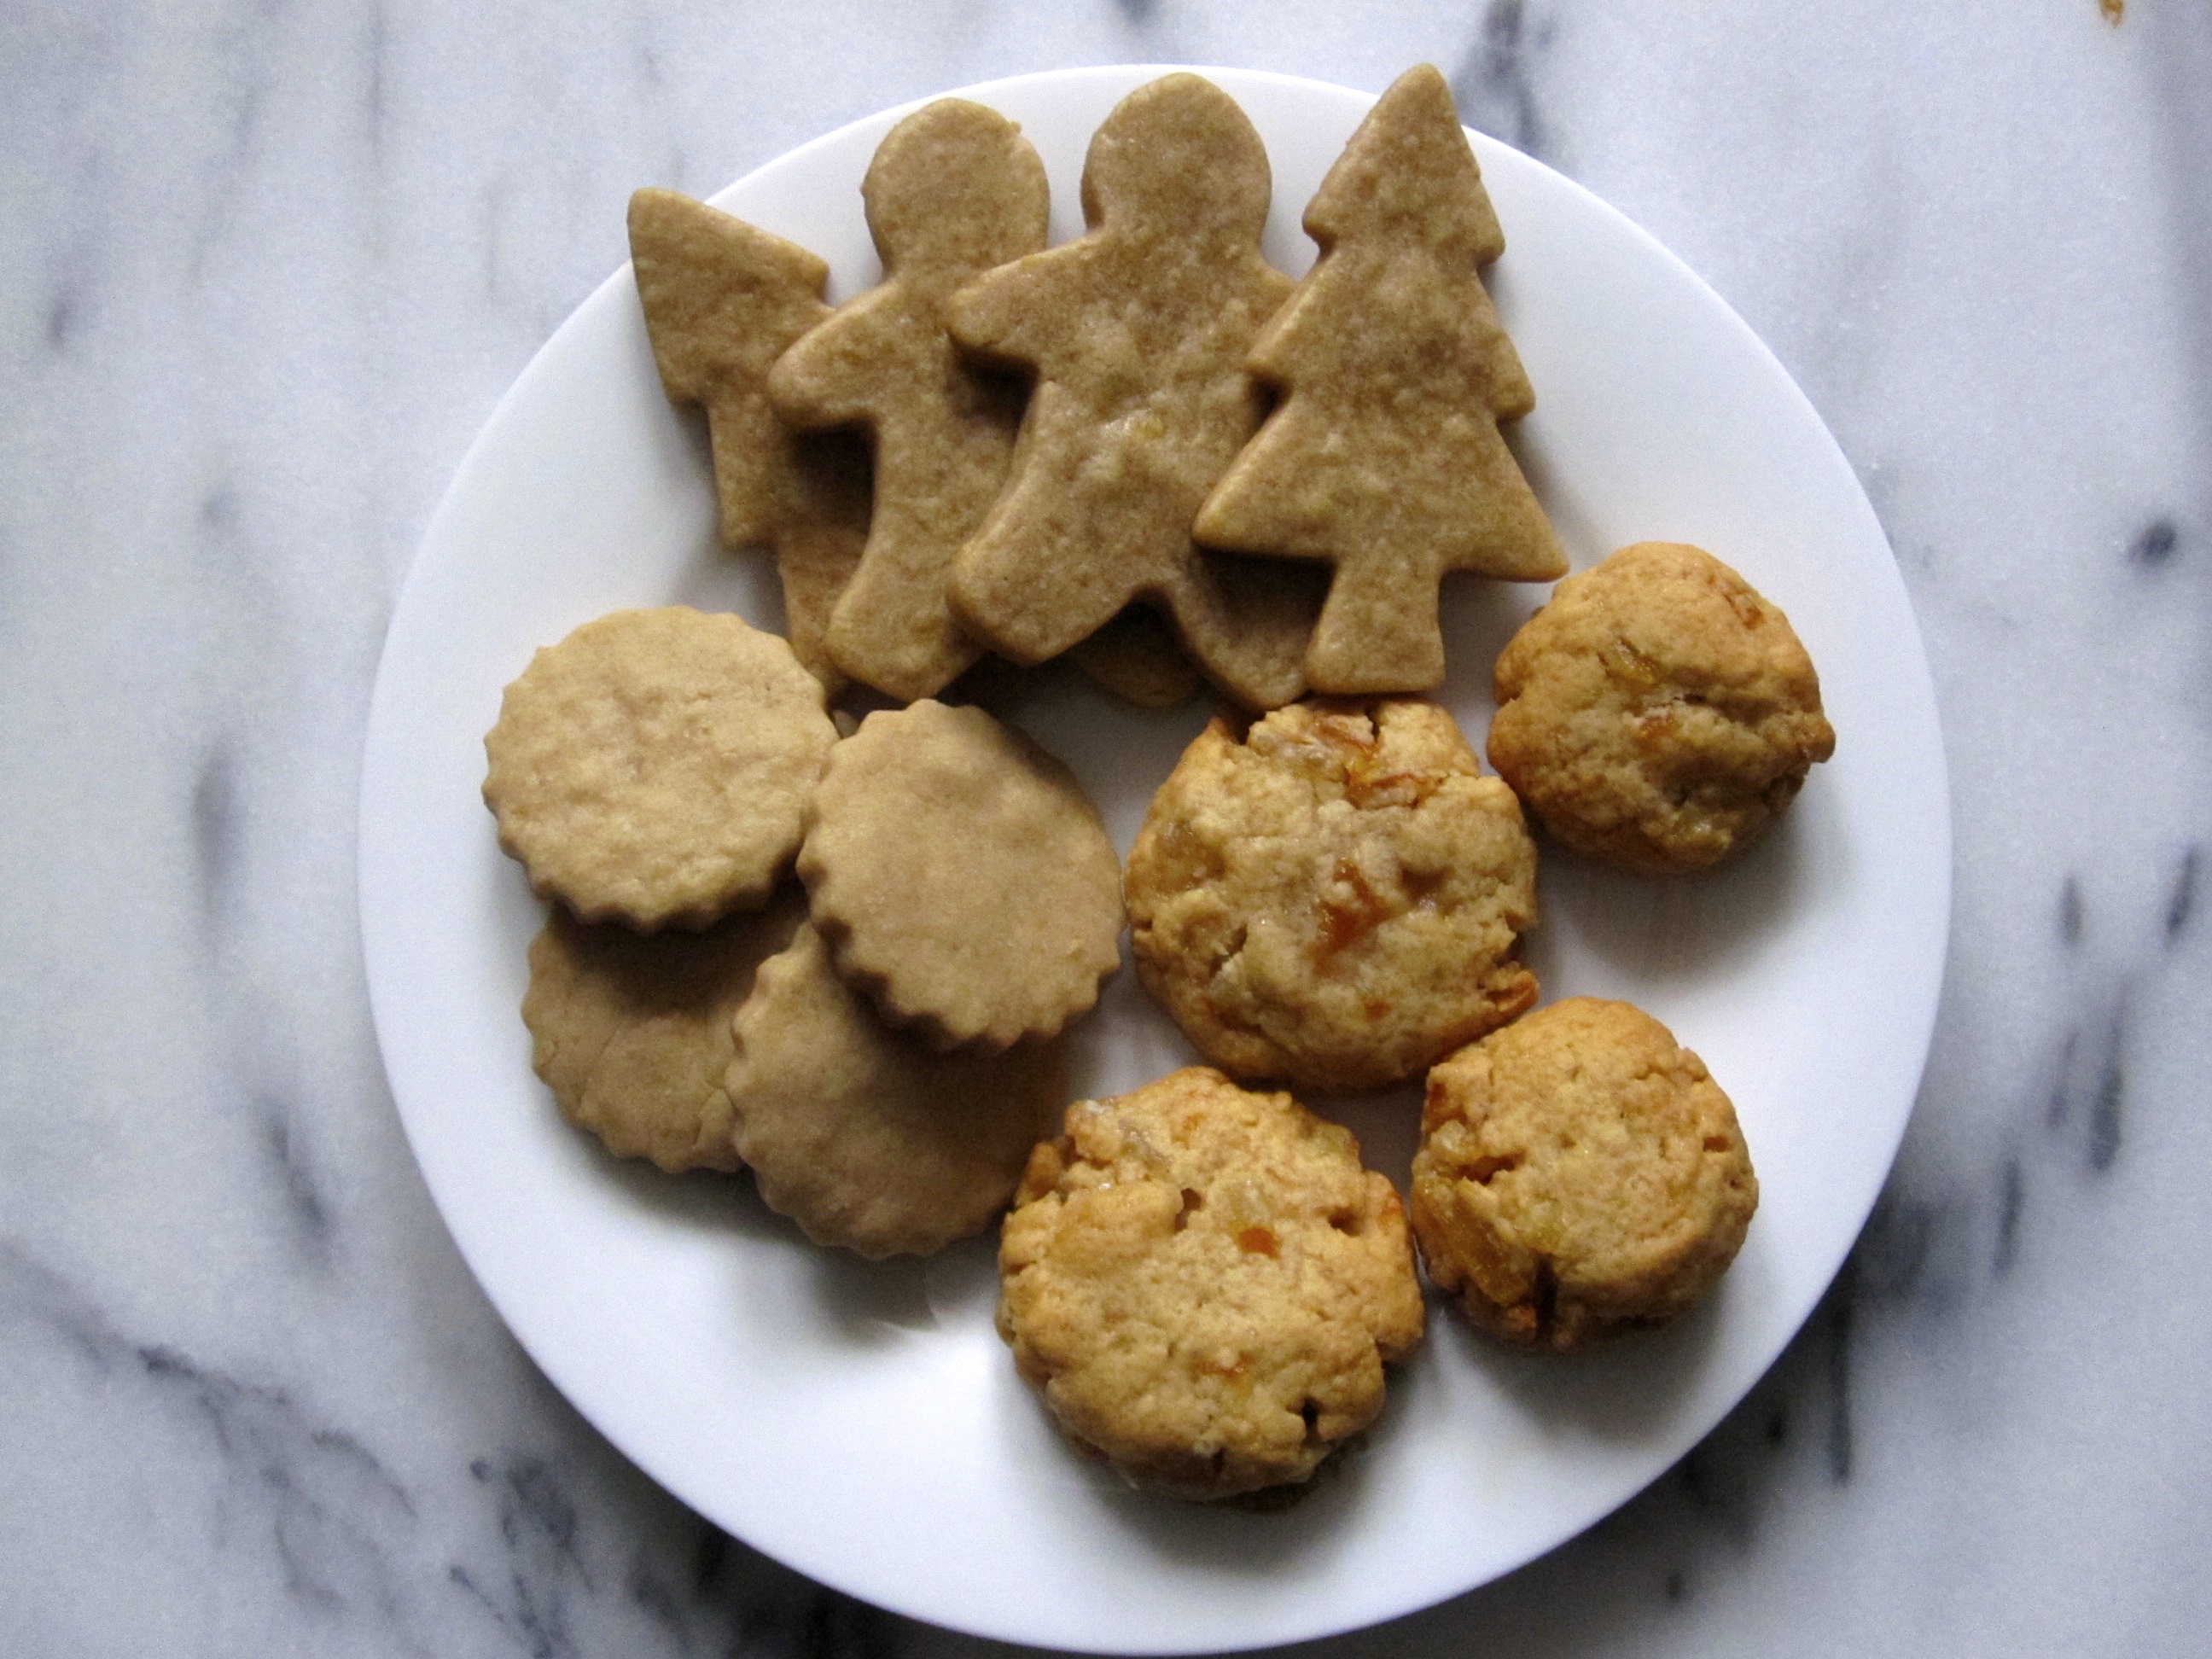
One winner, one respectable second-place finish! The “ginger-bread” gingerbread was surprisingly flavorful, given its short list of ingredients: there’s a LOT of sugar and butter and ginger in there, but they all meld well together, perhaps mellowed by the addition of milk, and these were neither overwhelmingly sweet nor too gingery. (I might even increase the ginger next time, maybe throw in 1/2 tsp. of powdered ginger to add some bite.) As noted above, I experimented with making these into balls, discs, and cut-out cookies. They all worked, but the cut-out cookies baked uniformly and had a good bite while retaining some softness. I’ll use this method from now on.

The “Gengerbread” gingerbread turned out to be tasty toothbreakers. Because the original recipe suggests melting the honey, I’m guessing that honeycomb might have been used here, and that the wax would have helped as both a binding and softening agent. I didn’t have any honeycomb, but I did have an old(ish) jar of honey waiting to be used – good enough. I had to add slightly more honey than called for to get the dough to hold together. They were still fairly dry and VERY hard. (I made them in two sizes and found the smaller cookies even more difficult to bite into than the larger ones!) Some gnawing was require on the first day, though they softened over the next few days. (And, as was helpfully suggested at the Folger talk, you could put a slice of bread or apple in the container with them to speed this softening process.) I like the candied peel + ginger combination very much – in fact, you taste the honey and the citrus more than the ginger here, which is interesting. I probably won’t be making these exact cookies again because I’m not sure my teeth can handle it, but I might play with adding honey and/or candied peel to some other gingerbread recipes.

Will I abandon the family gingerbread recipe that I make every year? Not a chance. But making these two recipes – I’ll report back on the third once I acquire some treacle – introduced me to some new gingerbread ideas and highlighted the variety available in just one recipe book. And the room to play with different techniques. In this project, not being given a specific method can nerve-wracking – particularly for someone who likes to follow very precise baking instructions. (See: me.) But it’s also liberating. There’s room for creativity, fun, and experimentation in the ambiguity. I’m looking forward to seeing what else is in Cotton’s book. Stay tuned.


To Make a Potatoe Pudding

[Note: You can now follow us on Twitter, Instagram, and Facebook! See links to the right.]

Recently, Marissa and I faced off … over rice pudding. We each made a different eighteenth-century rice pudding recipe and compared results, which we’ll discuss in an upcoming crossover post here and on The Recipes Project.  (Spoiler: we declared a draw.)

A few of the early modern recipe books contain handy tables of contents, but most don’t, and obviously none are text-searchable (if only!), so hunting for a specific recipe like rice pudding can prove a challenge. Judeth Bedingfield’s recipe book (UPenn MS Codex 631) from the 1730s and 40s has become one of my go-to sources because of its comprehensiveness – and sure enough, it turned up not one but four rice pudding recipes. In this hunt for rice pudding, I was reminded of the astonishing range of other puddings in her book: orange (x3), “green quaking” (with spinach), carrot (x2), apple, potato, caraway, oatmeal (x2), calves’ foot, hasty, barley, marrow (x2), “quaking,” “shaking,” green, liver, white (x3). A pudding bonanza! We made Bedingfield’s carrot pudding early on in the project and still count it among our favorites, so I was ready to try another one. I chose potato because I was curious to taste it – curiosity is the driving force in most of my early modern recipe selections!

The Recipe

potatoe pudding

To Make a Potatoe Pudding

Take one pound of Potatoes, Boyle them till they peel, pound them in a morter, melt half a
pound of butter, a quarter of a pint of sack, put into them, take six eggs, leave out half [th]e
whites, sweeten it to y[ou]r tast, stirr it all together, grate a Little nutmeg in it when you bake it
butter y[ou]r Dish very well, three quarters of an hour will bake it /

IMG_4775

Our Recipe
[halved from the original*]

1/2 lb. potatoes (about 1 large), peeled and cubed
1/4 lb. butter (1 stick), melted
1/4 c. white wine
3 eggs, separated (3 yolks, 1.5 whites)
1 tbsp. sugar
1/4 tsp. nutmeg

Preheat oven to 350F. Butter or spray a small baking dish (or ramekins)**.

Boil potatoes until they can be pierced with a fork (about 10 mins). Transfer to a food processor, then add the melted butter, white wine, egg yolks + whites, and nutmeg. Pulse until completely smooth. Pour mixture into baking dish and smooth the top with a spatula. Bake for 30 mins, until top is puffed and golden brown. Let cool on a wire rack and serve warm or at room temp.

*Note: Why do we halve most of these recipes? Because they often make a large quantity, because usually we’re feeding just a few people, and, most importantly, because they’re experiments. Neither of us wants to waste ingredients, so wherever possible, we make a smaller quantity to see how it turns out.

**Note: I used a 6.5″ square Corning Ware casserole “borrowed” (um, several years ago) from my mom, who received it as a wedding gift in the 70s. The pudding layer was fairly shallow in this small dish – probably too shallow for an 8″ square – so ramekins would work nicely too.

The Results

Carrot pudding still comes out the winner for me in our Great (and ongoing) Pudding Experiment, but potato pudding was interesting. While the carrot pudding recipe includes a specified amount of sugar and candied peel AND instructs the cook to sweeten it to taste, this one simple directs the cook to sweeten it to taste. The white wine and nutmeg produce a flavor profile not quite sweet or savory (especially given that the recipe doesn’t call for any salt), so how much sugar you add can alter the taste considerably. It tastes recognizably of potatoes – in fact, I’d perhaps try this with sweet potatoes, since I really like their natural flavor – and bakes up quite firm, more so than the carrot pudding. I’d had enough after a few bites. The potato plus some tang from the wine plus the earthiness of the nutmeg didn’t quite add up to something I’d be eager to try again. But it’s very easy to make and requires few ingredients, making it a simple dish to prepare. This ease might explain the prevalence of all varieties of pudding in early modern cooking – they’re easy, usually inexpensive, and can be scaled to large quantities. Stay tuned for the rice pudding report!

Bread and Butter Puddings

Reunited in the kitchen! Marissa has returned to Philadelphia from the west coast, and we’re cooking together again. (Yay.)

Many early modern recipes provide intriguing experiments – I made portugal cakes because I couldn’t quite imagine what they’d taste like (delicious), for instance, and artificial potatoes because I wondered if they’d look like actual potatoes (maybe/sort of). Some recipes we try end up with a taste surprisingly similar to familiar modern recipes, like the snickerdoodle-esque shrewsbury cakes. But with a few exceptions like one of our earliest and tastiest experiments, maccarony cheese, we don’t often come across recipes with an immediately apparent modern counterpart. Therefore, when I was leafing through my recent favorite, MS Codex 205, and spotted the recipe for Bread and Butter Puddings, it went straight to the top of my to-try list. We both love bread pudding (and bread generally), so this version from the 1770s or 80s seemed like a great way to celebrate cooking in the same place once more.

The Recipe

bread and butter puddings

10. Bread and Butter Puddings

To a Penny Loaf with the Crust cut off, and
slic’d put a Pint of boiling Milk, with 1/4 Pd.
Butter melted, cover it close, and when cold, braid
it fine & add 6 Eggs, a little Sack, 1/4 Pound
Sugar, 6 Ounces Currants. Bake them in a
quick Oven.
Melt Butter, Sack, and Sugar for Sauce.

Our Recipe

This is a fairly straightforward recipe: all of the ingredients are readily available (substitute raisins if you can’t find currants), the instructions are clear, and most of the measurements are precise. One direction brought us up short: to “braid” the soaked bread mixture. Braid it? I can’t even manage a french braid, let alone bread that has been soaking in milk and butter for a few hours! I’m glad that we went to the OED before attempting a hilariously messy plait: the dictionary suggests that “braid” could be a corruption of “bray” (“to beat small”). We interpreted this as cutting the soaked bread into smaller pieces. (Though why the dry bread couldn’t just be cut into smaller pieces before soaking is unclear.) The other interpretation would be to layer the soaked bread tightly before adding the egg mixture, perhaps because the slices were soaked in a single layer? But we’d already layered the bread before soaking it. But really, however you cut it and/or layer it, the bread will soak up the milk and egg mixtures and bake together into a delicious final product.

10-14 slices commercial white bread (14-20 oz. any bread), crusts removed*
1/4 lb. (1 stick) butter, melted
1 pint (2 c.) milk
6 oz. (1 1/2 c.) currants
4 oz. (heaping 1/2 c.) sugar
6 eggs
1/4 c. white wine

Arrange bread in a pyrex or other heatproof container – tear some of the slices in half to make them fit more closely. (You’ll be cutting the bread up more finely and transferring it to a baking dish, so don’t worry too much about careful arrangement.) Heat the milk just until bubbles form at the edges, add the melted butter, and pour over the bread. Gently press down on the top layer of bread with a fork to make sure it is evenly saturated. Cover container and set aside to cool to room temperature. (I hurried this step along by cooling it slightly and then transferring it to the fridge.)

Once bread mixture has cooled and the liquid has been mostly absorbed, cut the bread into smaller pieces by making an X motion with two table knives, just as you’d cut butter into pastry dough. Combine wine, eggs, and sugar and whisk lightly. Pour over bread mixture and add currants, then stir until everything is evenly distributed.

Heat oven to 350F. Transfer bread mixture to a well-greased 9×13″ baking dish** and bake for 60-70 mins., until puffed and golden brown. Cool on a wire rack and serve warm or at room temp.***

*Note: Determining how much bread to use was a little tricky. The early modern penny loaf was a small loaf of bread that cost – you guessed it – a penny, but the size of the loaf varied based on the cost of flour. So, based on the amount of liquid the recipe called for and by comparing it to modern bread pudding recipes, we used 10 slices of a commercial loaf of white bread. (We chose this because it was easy to pick up while we were getting the other ingredients; other bakery breads would also be great.) Before removing the crusts, the 10 slices weighed 14 oz. This amount of bread made for a delicious but very, very wet bread pudding; we agreed that another few slices would have made a good difference in texture. So, you could use anywhere from 14 to 18 or even 20 oz. bread (before removing the crusts), depending on what texture you prefer. There’s enough liquid that 20 oz. of bread should work; more than this might make for an overly dry pudding. And if you can plan ahead and use slightly stale bread, it will absorb the liquid even better.

**Note: We tried baking this in a 9″ pie dish but had to remove some of the mixture into two ramekins and bake them separately to avoid overflow. A larger baking dish avoids this problem. You could also distribute the bread mixture into ramekins or other smaller baking dishes: the ramekins did bake up adorably.

***Note: While the original does call for a sauce of butter, wine, and sugar, the bread pudding was so moist and rich that we didn’t feel like it needed the enhancement. If you’re feeling particularly decadent, however, by all means add the sauce!

The Results

It’s bread pudding. And therefore awesome. Need I say more? (I’m partial.) The white wine adds a slight tang to the milkiness, and the currants provide sweetness that isn’t overbearing. It’s good the day of baking (once cooled a bit) and as leftovers, too.

We sprinkled in some cinnamon because we like it. You could also add nutmeg, a little ginger, a splash of vanilla, some orange zest – whatever flavors you enjoy.